What is a Vector File in the Simplest Terms? (The Blueprint vs. The Photo)
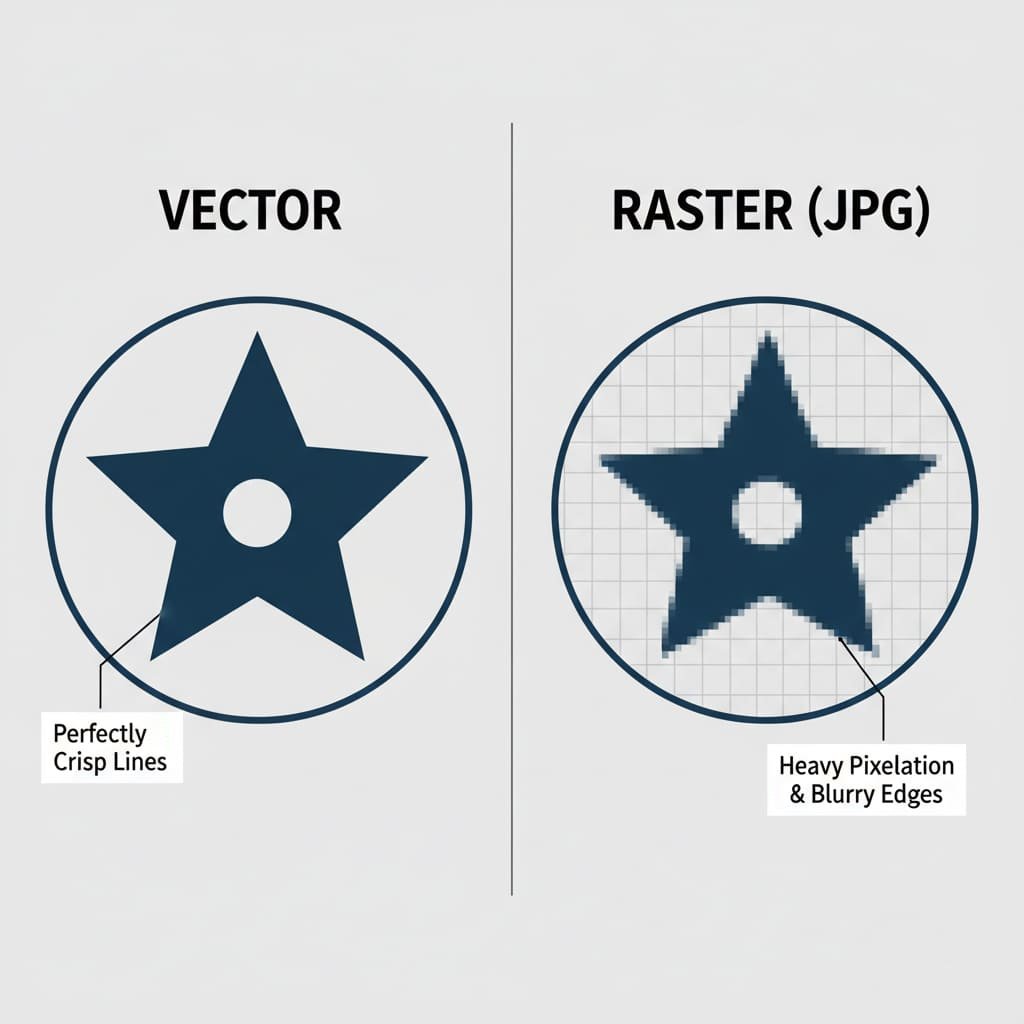
Let’s start with a simple, direct answer. A vector file is a digital illustration made of mathematical lines, points, and curves instead of pixels. Because it’s based on math formulas, it can be scaled to any size—from a tiny pin to a giant billboard—without ever losing quality or becoming blurry. It’s the industry-standard for any kind of high-quality printing or manufacturing.
The easiest way to understand this is with an analogy: the blueprint versus the photograph.
- A Vector File is like a Blueprint. It’s a set of precise instructions. It tells the computer, “draw a perfect circle here with this diameter,” and “draw a perfectly straight line from this point to that point.” A factory’s CNC machine can read these exact instructions to cut a flawless metal mold for your pin.
- A Raster File (like a JPG or PNG) is like a Photograph of the blueprint. It’s a snapshot made of thousands of tiny colored squares (pixels). From a distance, it looks great. But if you zoom in too close, all you see are the individual squares, and the edges become blurry and jagged. A machine cannot read this fuzzy picture to create a clean, sharp mold.
Why is Vector Artwork Absolutely Essential for Making Enamel Pins?
The need for vector art isn’t just a preference; it’s a physical requirement of the manufacturing process. The quality of your final pin is directly tied to the quality of the vector file used to create it.
- It Creates the Mold: The very first step in production is creating a custom steel mold of your design. A computer-controlled engraving machine uses the super-precise paths from the vector file to carve the design into the metal. Clean lines in the file equal clean, sharp lines in the mold. A blurry JPG would result in a messy, inaccurate mold.
- It Defines the Colors: The vector file creates the separate, enclosed “pools” that will be filled with enamel paint. The clean metal borders are critical to prevent different colors from bleeding into one another.
- It Allows for Perfect Scaling: Your design needs to be scaled to the exact production dimensions (e.g., 1.25 inches). Vector art allows our team to do this with perfect precision, ensuring every detail is proportional.
Vector vs. Raster Comparison Table
Key Differences: Vector vs. Raster Graphics
| Feature | Vector Graphics | Raster Graphics (JPG, PNG, GIF) |
|---|---|---|
| Made Of | Mathematical Paths, Lines, & Curves | A Grid of Colored Pixels |
| Scalability | Infinitely scalable without any quality loss. | Loses quality and becomes blurry when enlarged. |
| Common File Formats | .AI, .EPS, .SVG, .PDF (from vector software) | .JPG, .PNG, .GIF, .TIFF, .BMP |
| Best For | Logos, Illustrations, Pin Designs | Photographs, Detailed Digital Paintings |
| Why for Pins? | Required. Creates the clean, precise lines needed for the metal mold. | Not Directly Usable. Blurry edges create a messy, inaccurate mold. |
The “Factory-Ready” File: What We Actually Need
When a manufacturer asks for a “factory-ready” or “production-ready” file, they are looking for a vector file that meets a few specific technical requirements. Understanding these will help you communicate with any manufacturer like a pro.
The Official Checklist:
- Correct File Format: The file should be saved in one of the standard vector formats. The most common and preferred are
.AI(Adobe Illustrator) and.EPS. Other excellent formats include.PDF(when saved correctly from vector software) and.SVG. - All Text Converted to Outlines: This is a critical step. If you use a font in your design that our designers don’t have installed, their computer will automatically substitute it with a different one, which can ruin your layout. “Converting to outlines” is a final command in vector software that “locks” the text into a permanent shape. This ensures your typography looks exactly as you intended.
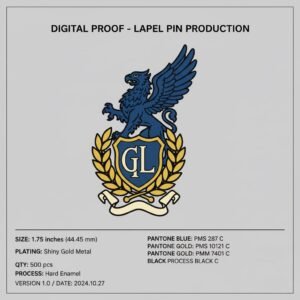
- Solid Pantone (PMS) Colors: Your file should specify the exact Pantone Solid Coated codes for each color area. This is the universal language for color in manufacturing and guarantees accuracy. For a deeper understanding of this crucial step, please read our guide on why Pantone matching is critical. Remember, gradients and shading are not possible for enamel pins, so only solid colors should be used.
- Clearly Defined Metal Lines: As mentioned, every color area must be completely enclosed by a metal line. The file should look like a clean coloring book page, with no gaps in the outlines.
I’m Not a Designer. What Are My Options?
This is the most important question for most of our clients. You have a great idea, but you don’t have the software or the skills to create a technical vector file. Don’t worry. You have several excellent, easy options.
Path 1: The Easiest Path – Let Our Experts Do It for Free
This is the simplest, most popular, and completely risk-free solution. Our entire business is built on making this process easy for you. You provide the idea, and we handle all the technical artwork for you.
What You Can Provide Us (Literally Anything):
- A Hand-Drawn Sketch: Have an idea on a napkin? A drawing in a notebook? Perfect. Take a clear photo with your phone and send it to us.
- A Low-Resolution JPG/PNG File: Have a company logo, a piece of digital art, or an image you found online that you want to adapt? No problem. Send us the highest-quality version you have.
- Just a Description: Don’t have a drawing at all? Just describe your vision to us in an email. Our professional artists are experts at turning written ideas into beautiful visual designs.
What We Do (Our Free, All-Inclusive Design Service):
Once we have your concept, our professional design team gets to work. They will manually redraw your concept as a perfect, clean, production-ready vector file, making sure it adheres to all the critical manufacturing rules for line thickness and color separation. We then send you a professional digital proof (a high-quality mockup) for your approval. You can request as many changes as you need, and we offer **unlimited revisions** until you are 100% happy with the design. This entire service is **completely free** and comes with no obligation to order.
Path 2: The DIY Approach – Tools You Can Use
If you’re feeling adventurous and want to try creating your own simple vector file, it’s more accessible than ever. Here are a few tools you can use:
- Free Software (Inkscape): Inkscape is a powerful, free, and open-source alternative to Adobe Illustrator. It has full vector capabilities but can have a steeper learning curve for complete beginners.
- Web-Based Software (Vectr, Canva): These browser-based tools are very user-friendly. While some of their advanced vector export features might be part of a paid plan, they are great for creating simple shapes and text.
Path 3: The Professional Path – Hiring a Freelance Designer
If your project is highly complex, part of a larger branding initiative, or you simply want to work with a specific artist, hiring a freelance designer is a great option. You can find talented designers on platforms like Upwork, Fiverr, or 99designs.
When hiring a freelancer, give them this exact instruction: ‘I need a factory-ready vector file for an enamel pin. The final file should be in .AI or .EPS format, with all text converted to outlines, and all colors specified as Pantone Solid Coated.’ This will ensure you get exactly what a manufacturer needs.
Common Artwork Issues and Solutions
| Your Problem | The Simple Solution |
|---|---|
| “My logo is a JPG/PNG file. Can you use it?” | Yes! While we can’t use it directly for the mold, our artists will use your file as a perfect reference to professionally redraw it as a clean vector file. This is a core part of our free design service. |
| “My design has gradients, shading, or a photograph.” | For a traditional enamel pin, these effects won’t work. We offer two great solutions: 1) Our designers can help you simplify the design, expertly converting the gradients into beautiful solid colors. 2) We can produce your design as a Printed Pin, which perfectly reproduces photographic detail. |
| “The proof you sent back looks different from my original art.” | This is a normal and very important part of the process! It usually happens for technical reasons, like lines being too thin or text being too small. A good manufacturer will explain what they changed and why. This is a sign of an expert partner helping you create a better final product. |
| “Why are there thick black lines all over my design in the proof?” | Those lines represent the raised metal that will separate the colors. They might look prominent on a digital screen, but on the final, small pin, they will look proportional and are essential for a clean result. For more guidance, see our 10 Critical Design Tips for Pins. |
Your Jargon-Busting Glossary of Vector Terms
This industry is full of technical terms. Here’s a simple, jargon-free glossary to help you understand the language.
- AI File (.ai): The native file format for Adobe Illustrator, the industry-standard vector design program.
- Convert to Outlines: A command in vector software that turns editable text into permanent shapes, preventing font errors.
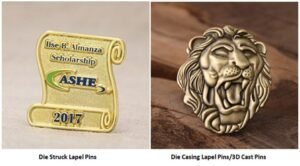
- Die Lines: The raised metal lines on a pin that form the outline of the design and separate the colors.
- DPI (Dots Per Inch): A measure of resolution for raster (pixel-based) images. 300 DPI is considered high-resolution for printing.
- EPS (Encapsulated PostScript): A common vector file format that is compatible with a wide range of design software.
- JPG/JPEG: A common raster image format, best used for photographs. It uses “lossy” compression, meaning it loses quality each time it’s saved.
- Mockup / Proof: A digital image provided by the manufacturer that shows what your final pin will look like.
- Pantone (PMS): A standardized color matching system used in manufacturing to ensure precise and consistent color reproduction.
- Pixel: A single tiny square of color that is the smallest building block of a raster image.
- PNG: A raster image format that is great for web graphics because it supports transparent backgrounds.
- Raster: Any image made from a grid of pixels. It cannot be scaled without losing quality.
- SVG (Scalable Vector Graphics): A vector file format that is popular for web use because it can be scaled within a browser.
- Vector: Any image made from mathematical paths. It can be scaled infinitely without losing quality.
You’re Ready to Go!
You now have all the knowledge you need to confidently tackle the artwork for your custom enamel pin project. A clean vector file is the essential blueprint for a high-quality product, but you don’t need to be a professional designer to get one.
By understanding these core concepts and partnering with an expert manufacturer, you can ensure your creative vision is translated perfectly into a stunning, factory-ready design. The technical details are our job; your job is to bring the great ideas.