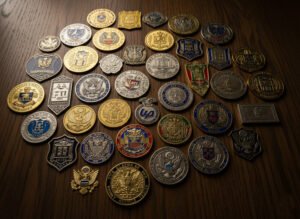
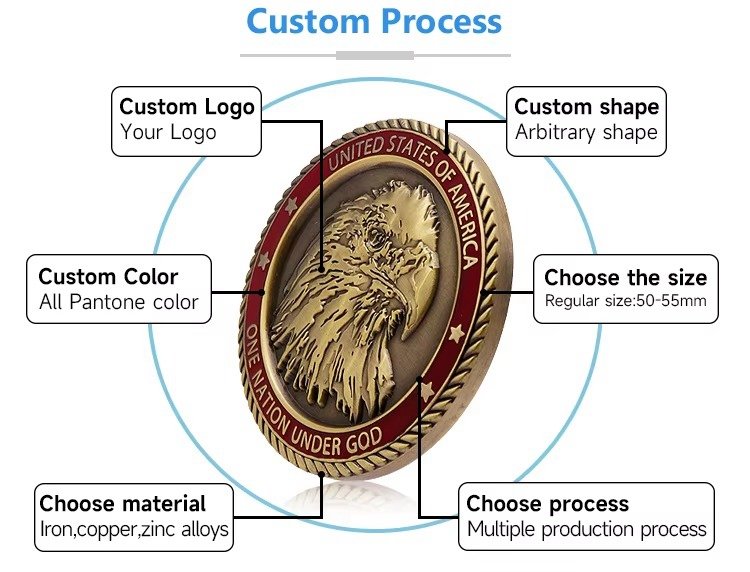
The Significance Behind the Metal
Before we dive into the machinery and molten metal, it is essential to understand why the manufacturing process is so rigorous. A challenge coin is more than a collectible; it is a physical representation of membership. The manufacturing quality must match the weight of the sentiment. A poorly made coin diminishes the honor; a well-made coin elevates it.
The Legend of the Wealthy Lieutenant (World War I)
To truly grasp the importance of durability in these coins, we must look at their most enduring origin story found in military history. As detailed in historical archives, the tradition traces back to World War I. A wealthy American lieutenant volunteered for the Army Air Corps. He wanted to give his squadron a memento of their service, so he ordered small, solid bronze medallions struck. He gave one to every pilot in his unit.
One of these pilots, a young American, placed the medallion in a small leather pouch around his neck. Shortly after, his aircraft was severely damaged by ground fire, forcing him to land behind enemy lines in Germany. He was immediately captured by a German patrol. To discourage his escape, the Germans stripped him of all his identification, uniform insignia, and personal belongings—except for the small leather pouch, which they overlooked.
Later, the pilot managed to escape during a bombardment. He donned civilian clothes he found and eventually crossed into No Man’s Land, reaching a French outpost. However, the French soldiers, wary of German saboteurs posing as civilians, prepared to execute him. He had no ID tags. In a last-ditch effort to prove his allegiance, he pulled out the bronze medallion. One of the French captors recognized the squadron insignia stamped on the coin. Instead of an execution, the pilot was given a bottle of wine. This event solidified the coin as a literal lifesaver, birthing the tradition of the “Challenge.”
The “Coin Check” Rules
That wartime necessity evolved into a drinking game known as a “Coin Check,” which is still practiced in bars and mess halls today. The manufacturing of the coin must be durable enough to withstand this tradition. The rules are simple but strict:
- The Challenge: A challenge is initiated by drawing your coin and holding it in the air or slamming it on a table (though slamming is discouraged if it damages the coin!).
- The Response: Everyone present must produce their unit’s coin immediately.
- The Consequence: If someone cannot produce their coin, they must buy a round of drinks for the challenger and everyone else who had their coin. However, if everyone does produce their coin, the challenger must buy the round. This ensures that members carry their symbols of loyalty at all times.
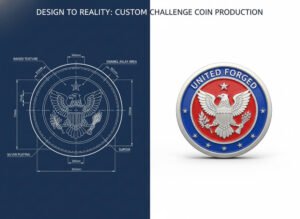
Phase 1: Design and Engineering
The manufacturing process begins long before any metal is heated. It starts in the digital realm. The transformation from concept to manufacturing blueprint is the most critical step in ensuring the final product looks correct. This phase bridges the gap between imagination and engineering.
1. Conceptualization and Vector Art
The process starts with brainstorming. Clients often provide rough sketches, logos, or even a description like “I want a bulldog holding a wrench with a lightning bolt in the background.” Designers must take these disparate elements and arrange them into a circular canvas (usually 1.5 to 2 inches in diameter).
Manufacturing machines cannot read a JPEG or a photograph. They require Vector Art. Designers use software like Adobe Illustrator to create mathematical lines and curves (files like .AI or .EPS). This artwork is then converted into a “Digital Proof.” The proof serves as the blueprint for the factory. It specifies size, shape, plating type, and the specific Pantone (PMS) colors to ensure branding consistency.
Technical Design Constraint: The Metal Wall. A crucial aspect of designing for production is the “Metal Wall.” In enamel coins, every color must be contained by a raised metal line to prevent the liquid enamel from spilling into the neighboring area. You cannot fade from Red to Blue in a gradient; you must have a metal line separating a block of Red from a block of Blue. These metal walls must be at least 0.2mm thick to withstand the plating and polishing process. If a design has hairlines thinner than this, the factory must thicken them, which is why the Digital Proof is so vital for approval.
2. Understanding 2D vs. 3D Design
A major decision in the design phase is choosing between 2D and 3D modeling, as this dictates the type of mold required.
- 2D Design: This consists of two distinct levels: flat (recessed) and raised (polished). Think of a cartoon drawing or a corporate logo. It has clean, sharp lines and flat surfaces. This is best for text and simple graphics.
- 3D Design: This involves sculpting. The metal has rounded contours, slopes, and gradients of height. Think of the face on a quarter or a statue. This is necessary if you want to depict realistic people, animals, mountains, or vehicles. 3D designs require a much more complex mold-making process.
Phase 2: Material Selection
Before the molds are cut, the factory must determine which base metal will be used. The “soul” of the coin depends on this choice. While coins can be plated in gold or silver, the core material dictates the weight, the detail capability, and the cost.
Zinc Alloy: The King of Versatility
In modern coin production, Zinc Alloy is the most popular choice. Why? Because it is processed through injection molding (die casting) rather than stamping. This allows for incredible flexibility. If your design has holes cut out of the middle (cutouts) or requires deep 3D relief where a face looks like a miniature sculpture, Zinc Alloy is the material of choice. It is lighter than brass but can be made thicker to compensate, giving it a substantial feel without the high cost. Because it starts as a liquid, it flows into every crevice of a complex mold.
Brass: The Traditional Heavyweight
For those who want the traditional “thud” when a coin hits the table, Brass is the gold standard. Brass is a copper and zinc alloy that is heavy, dense, and highly resistant to corrosion. It is typically used in the die striking process. Because brass is a harder metal, it holds fine lines exceptionally well, making it perfect for coins with a lot of text or intricate 2D logos. When you hold a brass coin, you feel the density of the material immediately.
Iron: The Budget-Friendly Option
Iron is a ferrous metal, meaning it is magnetic. It is often used when budget is a primary concern. While it can rust if not properly plated and sealed, modern manufacturing techniques make iron a viable option for large-volume orders where cost-efficiency is key. However, it is harder and less malleable than brass, which can limit high-relief 3D designs.
Phase 3: Mold Making (Tooling)
Once the artwork is approved and the metal selected, the virtual becomes physical. This phase involves creating the “Die” or “Mold” that will form the metal. This is a one-time setup cost in the production process, often referred to as the “Die Fee.”
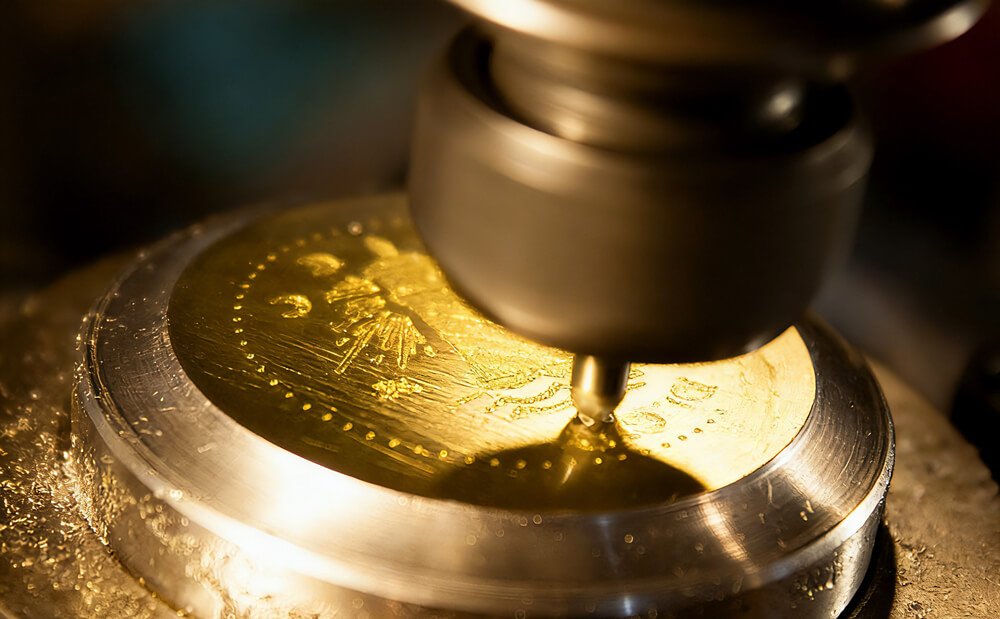
CAD and CNC Milling
The vector artwork is fed into a CAD (Computer-Aided Design) system. This creates a 3D digital map of the coin’s surface. This data is then sent to CNC (Computer Numerical Control) milling machines. The CNC machine takes a solid block of high-grade steel and carves the negative image of the coin into it. It acts like a high-tech chisel, removing steel to create the cavities where the coin metal will eventually flow or be pressed.
For every coin, two molds are usually required: one for the front (obverse) and one for the back (reverse). If the coin has a 3D design, the CNC milling process takes significantly longer to carve the gradients and curves, which is why 3D molds are more expensive than 2D molds.
Heat Tempering: Preparing for Violence
The steel mold must be incredibly hard to withstand the violence of the minting process. Once the design is carved, the steel die is placed in a red-hot oven. This heat treatment changes the molecular structure of the steel, hardening it. After it reaches the critical temperature, it is doused (quenched) in cool oil. This process, known as tempering, ensures the die won’t crack or shatter under the thousands of pounds of pressure it is about to endure.
Phase 4: The Minting Process
Now that the molds are ready, the actual production of the coin blanks begins. There are two primary methods used, depending on the base metal selected: Die Striking or Die Casting.
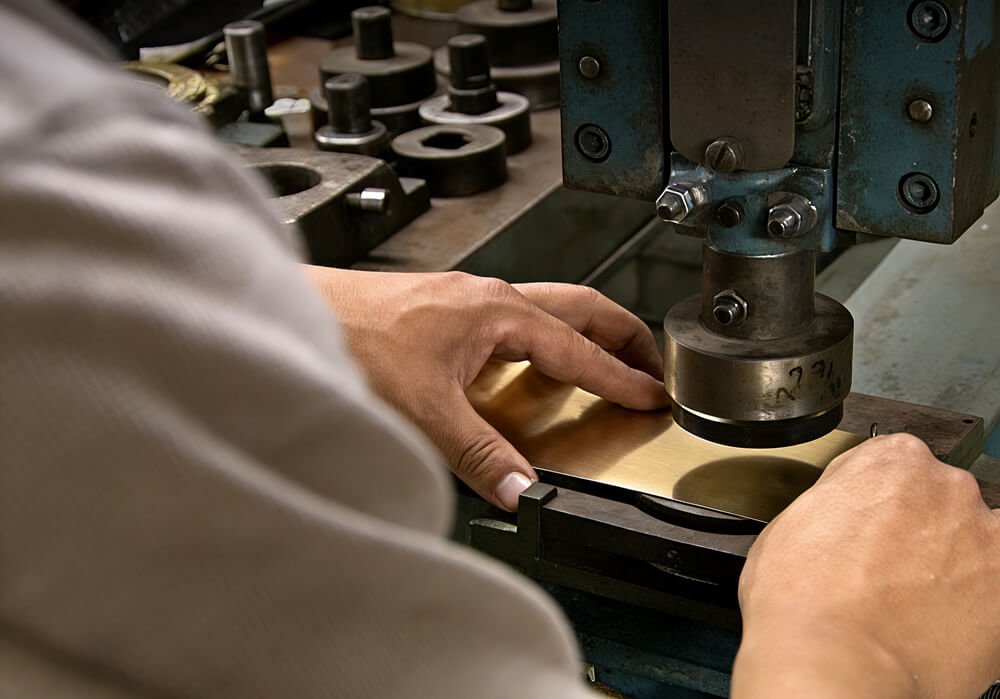
Method A: Die Striking (Stamping)
This is the traditional method used for Brass, Iron, and Copper. It relies on brute force to shape the metal.
1. Blanking: Strips of the chosen metal are fed into a machine that punches out featureless round discs, known as “blanks” or “planchets.”
2. The Strike: The blank is placed between the two steel dies (front and back). A massive hydraulic press slams the dies together with immense force—often between 500 to 1,000 tons of pressure.
3. The Flow: Under this crushing weight, the solid metal flows like clay into the recesses of the die, capturing every detail of the logo and text. Sometimes, the coin must be struck multiple times to ensure the metal fully fills the deep crevices of the design.
Method B: Die Casting (Injection Molding)
This method is primarily used for Zinc Alloy and is more akin to plastic manufacturing but with liquid metal.
1. Molten Soup: Instead of a solid strip, the zinc is heated until it is a liquid molten soup.
2. Injection: The two halves of the mold are clamped together, and the molten metal is injected into the cavity under high pressure.
3. Solidification: The metal cools and hardens almost instantly. The mold opens, and the raw coin is ejected.
Why use this? Casting allows for complex shapes, cutouts (holes in the coin), and intricate 3D details that would be impossible to achieve by stamping solid metal.
Phase 5: Surface Preparation
Fresh out of the press or mold, the coin is not yet ready for display. It is raw, sharp, and dirty. It needs refinement before it can be plated.
Deburring
The minting process often leaves behind excess metal around the edges, known as “spurs” or “burrs.” If you held a raw coin, it might cut your hand. To fix this, coins are put through a deburring process. They are often placed in tumbling machines filled with ceramic stones or other media. The tumbling action grinds away the sharp edges, leaving a smooth circumference.
Polishing (Buffing)
Before any gold or silver plating can be applied, the surface of the base metal must be perfectly smooth. Any scratch on the brass will show through the gold plating. Coins undergo a rigorous polishing process. This can be done by machine or by hand. Workers hold the coins against high-speed buffing wheels. Different polishing compounds are used depending on the metal—for example, a rouge compound is often used for brass to bring out a high luster, while a white diamond compound might be used for harder metals. This step is labor-intensive but critical for achieving a mirror-like “proof” quality.
Phase 6: The Electroplating Process
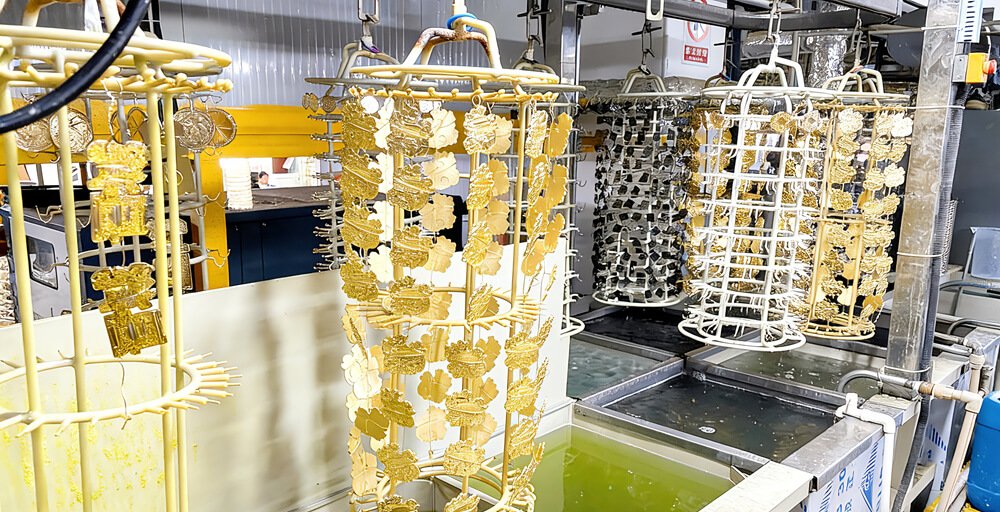
This is the stage where the coin gets its “skin.” Most challenge coins are not solid gold; they are brass or zinc wearing a gold coat. This is achieved through electrochemistry.
The Plating Line
The coins are attached to copper wires on a rack. They are dipped into a series of chemical baths. First, they are cleaned to remove any oil or polishing residue. Then, they are submerged in a tank containing a solution of the plating metal (e.g., gold, silver, nickel). An electrical current is run through the tank. The electricity causes the precious metal particles in the solution to bond to the surface of the coin.
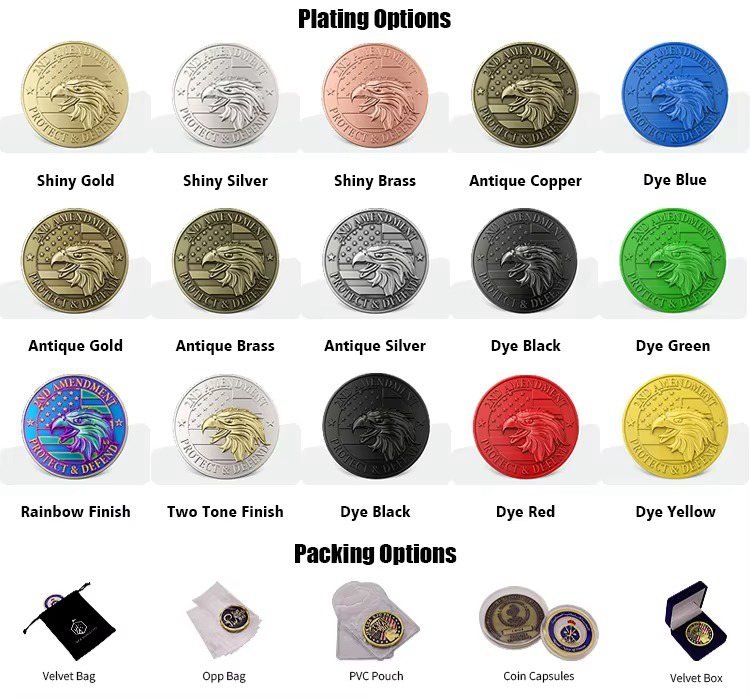
Deep Dive: Plating Aesthetics
The choice of plating fundamentally changes the character of the coin. Based on manufacturing standards, here is a detailed look at the specific visual effects of each option:
1. Antique Plating (The “Worn” Look)
Antique plating is one of the most popular choices for military and law enforcement coins because it highlights 3D details. After the coin is plated in gold, silver, or bronze, it is dipped into a dark oxidizing solution (often a black wash). The coin is then buffed or brushed. The dark oxidation remains in the recessed areas (the valleys), while the raised areas (the peaks) are polished back to the base metal brightness. This creates high contrast without using paint and gives the coin a “battle-worn” or historical aesthetic.
2. High Polish (The “Jewelry” Look)
High polish coins are dipped in the plating solution and then buffed to a mirror finish. Gold and Silver are the standard for ceremonial awards. However, because they are so reflective, they often require “Soft Enamel” or “Sandblasting” in the background to make the raised text legible. Without a contrasting texture, a high-polish coin can be difficult to read in bright light.
3. Dual Plating (The Premium Choice)
Dual plating is the most labor-intensive plating process. It involves combining two different metals on a single coin—for example, a Silver eagle on a Gold background. To achieve this, the factory must use a masking agent. They cover (mask) the parts of the coin that should remain Gold, then dip the coin in Silver. The mask is then removed. This adds significant time and cost to production but results in a striking, high-value appearance.
4. Black Nickel and Powder Coating
Black Nickel is a distinct, shiny dark grey finish excellent for “tactical” or “covert” style coins. Alternatively, Black Metal is usually a matte finish created through powder coating. This is an electrostatic process where a black powder is sprayed onto the coin and cured under heat. It is incredibly durable and provides a flat, non-reflective surface that makes bright enamel colors pop intensely.
Phase 7: Enameling and Coloring
While an all-metal coin is classy, many designs require the specific colors of a flag or unit patch. This is done using enamel paint.
Soft Enamel
This is the most common method. Workers (or machines) use syringes to inject liquid enamel paint into the recessed areas of the coin. The coin is then baked to cure the paint.
The Result: When you run your finger over a soft enamel coin, you can feel the “bumps.” The metal lines are raised, and the paint is lower. This gives the coin a textured, dimensional feel.
Hard Enamel (Cloisonné Style)
This is a more premium process. The recessed areas are overfilled with enamel paste. The coin is baked to harden the enamel. Then, the entire face of the coin is ground down and polished until the metal lines and the paint are flush and level.
The Result: A smooth, glass-like surface. It is durable and feels very high-quality.
Pad Printing
If a design has gradients (like a sunset) or tiny details that are too small for metal walls to separate, Offset Digital Printing or Pad Printing is used. This stamps the image directly onto the metal surface, similar to a standard printer.
Sandblasting and Texturing
Sometimes, the best color is no color at all. Texturing the metal is a vital step for coins that rely on metal-on-metal contrast (Die Struck with no enamel). Sandblasting involves blasting a high-pressure stream of abrasive particles (sand or glass beads) at the recessed areas of the coin. This creates a matte, frosted texture. When contrasted with the high-polish raised metal, this makes the logo and text pop without a drop of paint.
Phase 8: Edging and Upgrades

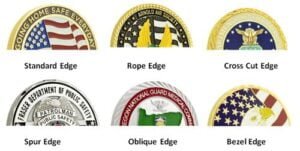
The rim of the coin is another opportunity for customization. While a standard flat edge is common, specialized edges add sparkle and tactile interest.
The Science of Diamond Cutting
While the mold creates the face of the coin, the edge is often processed on a separate machine called a Lathe. This applies specifically to “Diamond Cut” edges. After the coin has been plated (e.g., Gold), it is clamped into a lathe. A diamond-tipped cutting tool slices into the rim of the coin at high speed.
Because the cutter slices through the gold plating, it reveals the base metal underneath. If the coin is made of Brass (which is yellow), the cut remains yellow/gold. However, if the coin is Zinc Alloy (which is silver/grey inside), the cut reveals a silver sparkle against the gold plating. This creates a jewel-like, refractive border that catches the light from every angle.
Specific Edge Patterns
- Oblique Line: The most common diamond cut, featuring slanted lines that create a turbine-like effect.
- Cross Cut: A diamond crisscross pattern that resembles the grip of a pistol or a heavy file.
- Rope Edge: This is usually die-struck (part of the mold) rather than cut. It looks like a nautical rope wrapped around the coin, symbolizing the Navy or Coast Guard.
- Spur Edge: A distinct pattern where small notches are cut out of the rim, resembling the spur of a boot or a gear.
Phase 9: Quality Control and Preservation
Before a coin leaves the factory, it undergoes a rigorous inspection. This is not a machine process; it is done by human eyes and hands.
The Inspection
Inspectors check for color accuracy (matching the Pantone code), metal defects (scratches or bubbles in the plating), and cleanliness. Any coin that fails is discarded and recycled. Only the perfect coins move to packaging.
Presentation Matters: Packaging Options
The unboxing experience is part of the honor. Factories offer several tiers of packaging:
- PVC Pouch (Standard): A soft, clear plastic envelope. It protects the coin from scratching during shipping but is generally discarded.
- Acrylic Capsule: A hard, two-piece plastic shell that snaps shut. It is airtight and allows the coin to be viewed from both sides while protecting it from fingerprints and oxidation.
- Velvet Presentation Box: The highest tier. A hard-shell box covered in blue or black velvet with a formed insert to hold the coin. This is mandatory for coins presented by high-ranking officials or for corporate service awards.
Lucite Embedding: Permanent Preservation
For coins that are too valuable to carry or are meant as permanent desk awards, Lucite casting is a popular preservation method. The finished metal coin is suspended inside a liquid acrylic resin, which is then cured. However, not all coins can be cast. Coins made of Zinc Alloy or painted with Soft Enamel often react poorly with the chemicals in the liquid Lucite during the heat curing process, causing the paint to bleed. Brass coins with Hard Enamel are the best candidates for this preservation method.
Advanced Production Nuances: The Details That Matter
While the standard process covers the basics of striking and plating, true custom manufacturing involves several nuanced steps that differentiate a standard coin from a masterpiece. These advanced techniques utilize specific chemical and mechanical processes found in high-end minting facilities.
1. Advanced Enamel Options
Beyond standard soft and hard enamel, modern production offers specialized coloring options that can drastically alter the visual impact of the coin.
Translucent Enamel
This is a semi-transparent paint used primarily on “sandblasted” or textured metal backgrounds. Unlike opaque enamel which hides the metal underneath, translucent enamel acts like a stained-glass window. It allows the light to pass through the color and reflect off the metal texture below.
Production Note: The factory must ensure the metal underneath is polished or textured before the paint is applied. If the metal has flow lines or imperfections, the translucent paint will highlight them. This requires a higher standard of quality control during the minting phase.
Glitter and Glow Enamel
Glitter Enamel: Metallic flakes are mixed into the liquid soft enamel before it is syringed into the coin. The challenge here is the needle size; the dispensing needles must be slightly larger to prevent the glitter flakes from clogging the tip.
Glow-in-the-Dark: Phosphorescent powder is mixed with the enamel carrier. This paint appears off-white or light green in daylight but glows vibrant green or blue in the dark. For the best effect, this must be applied in wide, open areas of the design rather than thin lines, as the glow powder needs volume to hold a charge.
2. Texturing: Sandblasting and Foggy Painting
Not all contrast comes from paint. Factories use abrasive blasting techniques to create contrast between raised (polished) and recessed (matte) metal.
- Sandblasting: A high-pressure stream of glass beads or sand is blasted at the coin. To protect the raised areas that need to remain shiny, a masking template is often used, or the coin is blasted entirely and then the raised areas are re-polished. This creates a “frosted” look in the background that makes the polished text pop without using color.
- Foggy Painting: This is a technique where a very thin, misty layer of paint is sprayed over a 3D mold. It settles in the deep crevices of the sculpture (like the folds of a cloak or the eyes of a mascot) to create artificial shadows, enhancing the 3D depth.
3. The “Coin Check” Durability Test
A vital part of the production quality assurance is ensuring the coin can withstand the “drop.” Challenge coins are meant to be carried in pockets, dropped on bar tables, and handled daily.
The Plating Bond: If the electroplating is done too quickly (high voltage, short time), the gold/silver layer will be brittle and may flake off when the coin is dropped. A high-quality production line uses a “Low and Slow” plating method—lower voltage for a longer time—to ensure a thick, molecular bond between the base metal and the plating.
The Pre-Production Phase: Art Proofing and Molds
A significant portion of the “making” of a coin happens before metal is ever cut. The intellectual production process is just as vital as the physical one.
1. The Unlimited Revision Process
Unlike other manufacturing sectors, the challenge coin industry typically operates on an “Unlimited Revision” model during the digital proofing stage.
The Challenge: Translating a 2D drawing into a 3D metal object requires interpreting “height.” A designer must decide which lines will be raised metal walls and which will be recessed color pools.
The Proof: The factory generates a proof that shows the “cut lines.” If text is too small (under 6pt), the factory will flag it here. Ignoring these flags results in “metal blobs” where letters bleed together during the striking process.
2. Mold Retention Policies
Once your steel die is cut and tempered, it is a valuable industrial asset.
Storage: Factories coat the steel dies in industrial grease to prevent rust and store them in massive racked warehouses.
Lifespan: A high-quality steel die can strike approximately 50,000 to 100,000 coins before it begins to lose detail or crack.
Retention Period: Most factories retain these molds for 2 to 3 years. If you want to re-order your unit’s coins a year later, the “Die Fee” is waived because the tool already exists. After a period of inactivity (usually 3 years), the dies are recycled (melted down) to clear warehouse space.
Packaging and Assembly
The final step of production is assembly. Many coins are not just single pieces of metal; they require assembly of moving parts or attachments.
Spinners and Cutouts
Spinner Coins: These are composed of three parts: the outer ring, the inner spinning disc, and a central pin.
Assembly: The outer ring and inner disc are minted separately. A worker must manually insert the disc and hammer a pin through the vertical axis to lock it in place while allowing free rotation. This manual assembly adds significant time to the production line.
Bottle Openers
For functional coins, the metal must be thicker (3.5mm to 4mm) to handle the torque of opening a bottle.
The Cutout: The opening mechanism is usually created during the Die Casting process (Zinc Alloy) because stamping a hole through 4mm of solid brass is difficult and damages the dies. The internal edge of the opener must be left unpolished or specifically hardened to grip the bottle cap effectively.
The Economics of Production: Cost Factors
Understanding how manufacturing choices impact price is essential for planning. The cost fluctuates based on specific “levers” you pull during the design phase.
1. The Mold Fee (Setup Cost)
The most significant upfront cost is the Die Fee. This pays for the CNC machining and heat tempering of the steel dies. It is usually a one-time expense ranging from $50 to $300 depending on complexity (2D vs. 3D). If your coin has a different design on the back, two molds are required.
2. Quantity: The Economy of Scale
Manufacturing is a volume game. Ordering 50 coins might cost $8-$12 per coin because the setup labor is amortized over very few units. Ordering 1,000 coins can drop the price to $3-$5 per coin. Once the machine is running, the material cost is relatively low; you are paying for the time it takes to set up the line.
3. Material and Plating Costs
Brass and Zinc Alloy with standard Gold or Silver plating are the baseline. Premium upgrades like Dual Plating (two finishes on one coin) increase costs because they require manual masking and multiple trips through plating baths.
Conclusion
The journey of a challenge coin is a remarkable feat of manufacturing. It transforms a block of steel and a strip of brass into a lasting symbol of honor. It requires the brute force of a 1,000-ton press and the delicate touch of a paintbrush.
When you hold a challenge coin, you are holding the result of hours of skilled labor and centuries of tradition. It is a memento built to last lifetimes, carrying the weight of the memories attached to it. Whether for a military unit, a first responder team, or a corporate milestone, understanding the production process highlights just how special these tokens truly are.
FAQ
How are challenge coins made step by step?
The process generally involves 8 main steps: 1. Digital Design and Art Proofing. 2. CNC Mold/Die Creation. 3. Die Striking (Stamping) or Die Casting the metal. 4. Deburring and Polishing to smooth edges. 5. Electroplating with gold, silver, or other finishes. 6. Color Filling with enamel (if applicable). 7. Baking/Curing the enamel. 8. Final Inspection and Packaging.
What metal are challenge coins made of?
The most common base metals are Brass (for die-struck coins) and Zinc Alloy (for die-cast coins). Iron is used for budget-friendly magnetic coins. These base metals are then plated with finishes like Gold, Silver, Copper, Nickel, or Black Nickel.
What is the difference between soft and hard enamel coins?
The difference lies in the texture. Soft Enamel coins have raised metal ridges that separate the paint, giving the coin a dimensional, textured feel. Hard Enamel coins have the paint overfilled and then polished down until it is flush with the metal, resulting in a smooth, flat surface that feels like glass.
What is die striking vs die casting?
Die Striking involves placing a solid piece of metal (like brass) between two dies and stamping it with high pressure to imprint the image. Die Casting involves injecting molten liquid metal (usually zinc alloy) into a mold. Casting is better for complex shapes and cutouts, while striking is better for high-density, traditional coins.
Why do challenge coins have ridges on the edge?
Ridges are often added for aesthetic appeal and grip. These can be “Diamond Cut” edges, where a machine cuts patterns (like rope, oblique, or cross-cut) into the rim. This exposes the base metal underneath the plating, creating a two-tone sparkle effect, especially on brass coins.
How are 3D challenge coins made?
3D coins require a specialized mold created using 3D CAD software. Unlike standard 2D coins which have flat raised and recessed levels, 3D molds are sculpted with gradients and curves. Zinc Alloy casting is typically used for 3D coins because the molten metal flows better into the complex curves of the mold than stamped brass.