The Anatomy of a Pin Attachment
To choose the right backing, you first need to understand the machinery you are working with. A pin attachment isn’t just one piece; it is a system of friction and leverage. Let’s dissect the parts.
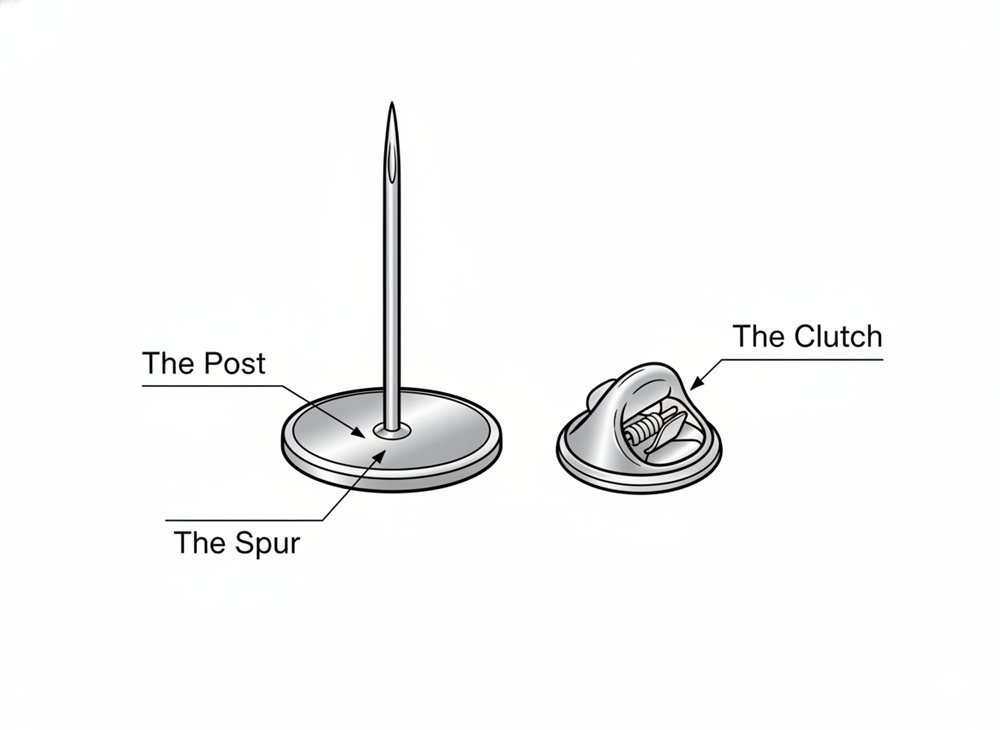
The Post (The Stem)
This is the foundation of the pin. The post is the sharp metal needle that is soldered onto the back of the pin’s face. The standard industry length for a post is typically between 8mm and 10mm. This length is universally designed to pierce through standard clothing materials—denim, cotton, polyester—while leaving enough of the needle exposed for the clutch to grip onto.
However, the post is not just a smooth wire. If you look closely (or use a magnifying glass), you will often see a small indentation or groove near the tip. This groove is crucial for mechanical locking backs, providing a ledge for internal springs to latch onto.
The Spur (The Nub)
One of the most annoying issues with enamel pins is “the spin.” Because a pin usually has only one post, gravity tends to pull the heaviest part of the design downward. If your pin is top-heavy, it will constantly rotate upside down.
To combat this, manufacturers add a “spur.” This is a tiny, sharp nub of metal located directly adjacent to the post. When you push the pin into your garment, you shouldn’t just push the needle through; you should press firmly enough that the spur also bites into the fabric. This creates a second point of contact, acting as an anchor to prevent rotation. It is a small detail that separates high-quality production from budget options.
The Rule of Two Posts
For serious collectors and designers, a single post often isn’t enough. If a pin design is larger than 1.5 inches in width or height, or if it features a heavy 3D mold, industry experts recommend the “Rule of Two Posts.” By soldering two separate needles onto the back, you guarantee stability. The pin cannot spin because it is anchored at two distinct points, and the weight is distributed more evenly across the fabric, preventing the garment from drooping or tearing.
Standard Pin Backs: The Essentials
When you buy a pin from a store or receive one at an event, 99% of the time it will come with one of two standard backings. These are the workhorses of the industry: accessible, affordable, and generally reliable for light use.
1. The Butterfly Clutch (Military Clutch)
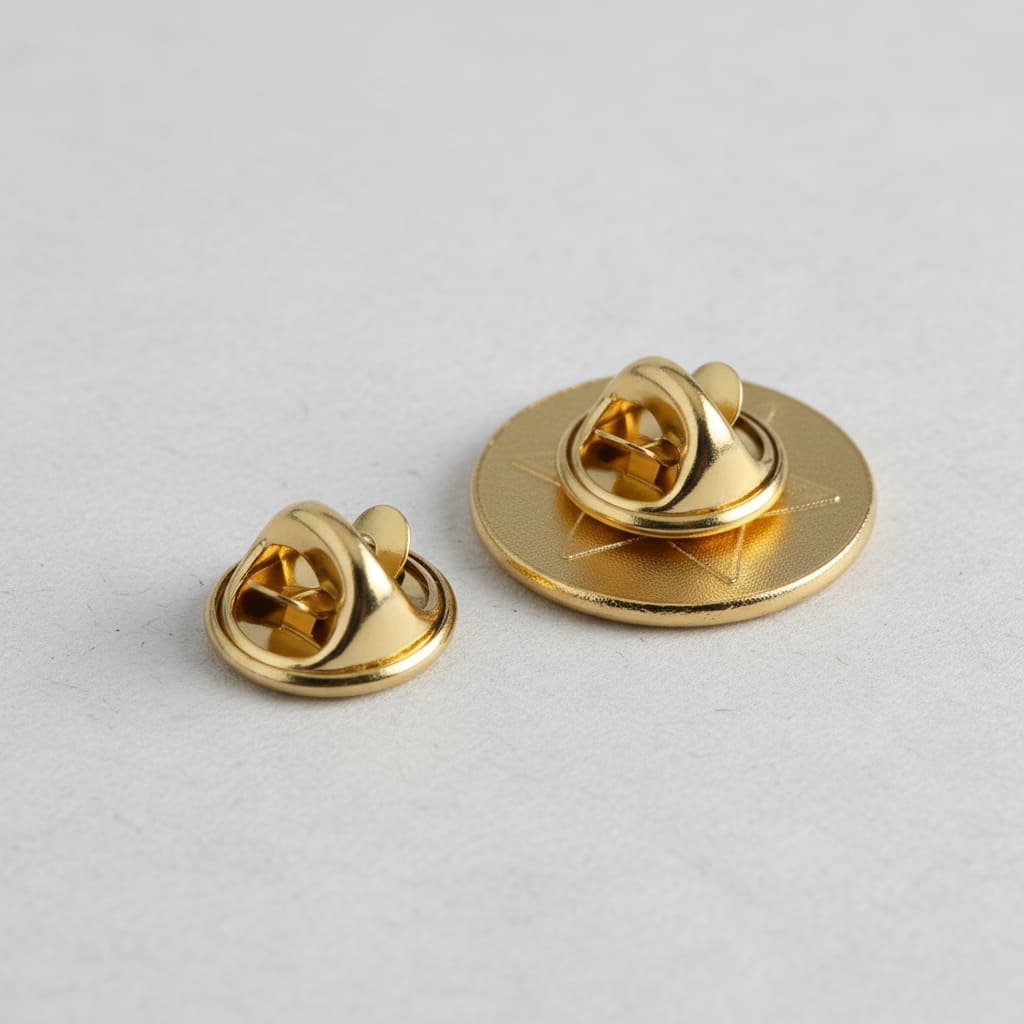
This is the icon. If you close your eyes and picture a pin back, you are likely picturing the butterfly clutch. It gets its name from the two small metal levers that resemble butterfly wings.
The Mechanism: Inside the small metal housing, there are tension springs. When the wings are in their resting position, the springs clamp down into the center hole. To release the grip, you squeeze the two wings together using your thumb and forefinger. This action spreads the internal springs apart, releasing the pressure on the pin post and allowing it to slide off.
The Pros:
- Low Profile: It sits very flat against the fabric, ensuring the pin doesn’t stick out awkwardly.
- Cost-Effective: It is the cheapest option to produce, which is why it is the standard “free” inclusion with almost all pin orders. Best of all, they are standard free options, a key point we discuss in our Complete Breakdown of Custom Pin Pricing.
- Ease of Use: The squeeze-to-release motion is intuitive and can be done quickly with one hand.
The Cons:
- Accidental Release: This is the fatal flaw. If you wear this on a backpack or a lanyard, and you lean against a wall or bump into something, the pressure can accidentally squeeze the wings. In an instant, the clutch releases, and your pin falls off unnoticed.
- Skin Irritation: The metal construction often leaves sharp edges. If worn on a shirt without an undershirt, these metal wings can scratch and irritate the skin throughout the day.
- Loosening Grip: Over time, the metal springs can fatigue. Once they lose their tension, they may slide off the post with barely any resistance.
2. The Rubber Clutch (PVC Back)
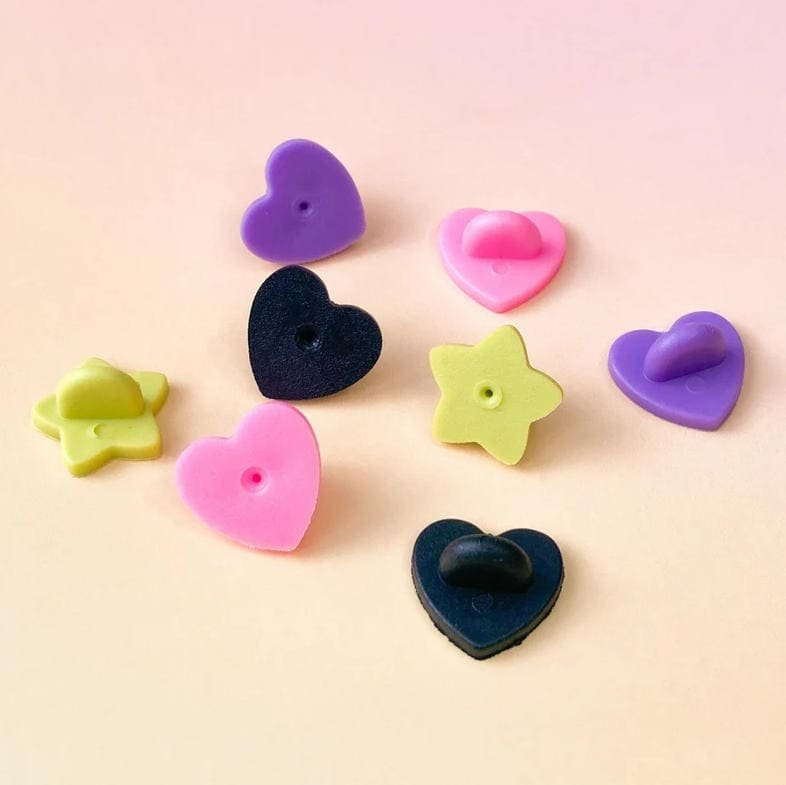
In the last decade, the rubber clutch has surged in popularity, becoming the preferred standard for many independent artists and modern brands.
The Mechanism: Simplicity is key here. There are no moving parts. The rubber clutch is a molded cap made of soft PVC with a hole in the center that is slightly smaller than the diameter of the pin post. It relies entirely on friction. You push it on, and the rubber expands tightly around the metal post.
The Pros:
- Supreme Comfort: This is the most comfortable backing available. The soft rubber is gentle against the skin, making it the only viable choice for hats, collars, or t-shirts.
- Surprising Grip: Don’t let the material fool you. A fresh rubber clutch often holds tighter than a cheap metal one. The friction fit is incredibly secure and resistant to vibration.
- Aesthetics: Rubber clutches can be molded in any color. While black is standard, neon pink, yellow, or blue backs can add a fun pop of color that matches the pin’s design.
The Cons:
- Environmental Degradation: Rubber is organic. Over years of exposure to UV light or heat, the material can dry out and crack, losing its grip.
- Accessibility: Because it relies on a tight friction fit, removing a rubber clutch requires a firm pull. People with arthritis or limited hand strength may find this difficult compared to the mechanical advantage of the butterfly clutch.
Verdict: Butterfly vs. Rubber?
Choose Butterfly: For display boards, lanyards, or thick jackets where skin contact isn’t an issue and you want a classic look.
Choose Rubber: For hats, shirts, or any garment touching your skin. It is also the better choice for vibrant, colorful artist pins.
High-Security Options: Locking Pin Backs
If you are attaching a pin to a motorcycle vest, a hiking backpack, or a denim jacket that sees rough use, standard backs are not enough. You need insurance. This brings us to the world of locking pin backs, designed specifically to prevent loss.
1. Deluxe Locking Clutch (Flathead & Ball-Top)
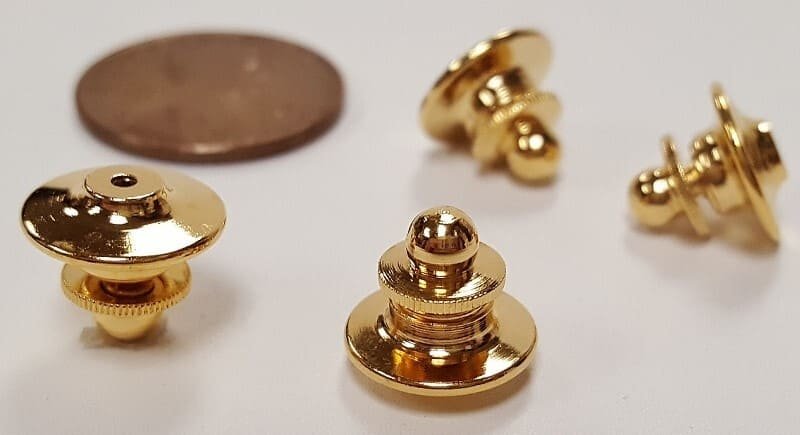
Often sold under names like “jewelry clutch” or “spring-loaded clasp,” this is the premium standard for security without tools. It is a sophisticated piece of hardware that looks elegant and functions brilliantly.
The Mechanism: Inside the cylindrical body lies a ball bearing and a strong spring. When you push the clutch onto the post, the post pushes the ball bearing aside until it snaps into the groove of the needle. The spring then forces the ball bearing to lock into that groove. You cannot pull it off by force—the harder you pull, the tighter it locks.
How to Remove (The Secret): Many people think these are stuck because they try to pull them off like a rubber clutch. To release, you must use a specific motion: Pinch the top disc and pull it UP (away from the fabric). This retracts the internal spring and releases the ball bearing.
Variations:
- Flathead: Sleek and modern with a flat top disc. Less likely to snag on things.
- Ball-Top: Features a decorative metal ball on top. It offers a vintage, classy look often seen on tie tacks.
Best Use Case: These are the gold standard for valuable pins on bags and coats. They are secure enough for daily abuse but can still be removed by hand if you want to swap pins.
2. Allen Key Pin Locks (Pin Keepers)
If the Deluxe Clutch is a deadbolt, the Allen Key Lock is a bank vault. These are simple, industrial, and nearly permanent.
The Mechanism: These are small metal barrels with a hole through the center and a threaded hole on the side. You slide the barrel onto the pin post, and then use a tiny hex key (Allen wrench) to tighten a “set screw” into the side. The screw digs directly into the metal of the pin post, clamping it with immense mechanical force.
The Pros:
Absolute security. A pin secured this way will practically never fall off accidentally. It is immune to bumps, squeezes, or vibrations.
The Cons:
- Inconvenience: You cannot remove the pin without the tool. If you lose the tiny Allen wrench, your pin is stuck on your jacket forever.
- Damage Risk: If you overtighten the set screw, you can bend or snap the pin post.
- Comfort: The barrel is often shorter than the pin post, meaning the sharp point of the needle might protrude through the back, poking your skin.
Fabric-Friendly & Specialty Backings
Sometimes the problem isn’t keeping the pin on; it’s protecting the garment. If you are wearing a silk blouse, a tuxedo, or a waterproof Gore-Tex jacket, poking a hole through the fabric is simply not an option. This is where specialty backings shine.
1. Magnetic Backs
Magnetic backings are the magician’s choice. They create the illusion that the pin is floating on the fabric.
How They Work: Instead of a post, a small, powerful rare-earth magnet is glued to the back of the pin. A separate, loose magnet is placed on the inside of the garment. The attraction between the two holds the pin in place through the fabric.
Types:
- Single Disc: Good for small, lightweight pins.
- Bar Magnet: A longer plastic bar containing two or three magnets. This is essential for wider pins or name tags, as it prevents the pin from tilting or sagging on thin fabric.
Best Use Case: Formal events, weddings, expensive suits, and uniform name tags where fabric integrity is paramount.
2. Safety Pin Backs
This is the “old school” approach, borrowing the mechanism from the classic safety pin or brooch.
The Mechanism: Instead of a post sticking straight out, a long needle is hinged horizontally across the back of the pin. The user threads the needle through the fabric and locks it into a hook or rotating clasp at the other end.
Why Use It?
Stability. Because the attachment point spans the width of the pin, it distributes the weight across a larger area of fabric. This prevents heavy or large pins from drooping or pulling the fabric down. It is also inherently secure because the needle is trapped inside the clasp.
3. Bent Legs
This is a niche backing you might see on law enforcement badges or captain’s hats. Instead of a post, the back features two long, flat metal strips.
Usage: These are designed for permanent mounting. The legs are pushed through pre-punched slits in a wallet, hat, or badge holder. Once through, the legs are bent outward, flattening them against the inside of the material. This creates a semi-permanent lock that is very low profile.
4. Adhesive Backing
Sometimes, you don’t need a pin mechanism at all. An adhesive backing is simply a strong, industrial-grade 3M double-sided tape applied to the back of the metal.
Best Use Case: This effectively turns your enamel pin into a high-quality 3D sticker. It is perfect for attaching logos to trophies, plaques, laptops, phone cases, or any hard surface where piercing is impossible.
Jewelry and Formal Wear Attachments
Lapel pins have a lineage that traces back to the Victorian era. Some attachment styles honor this history, focusing on elegance over utility.
1. Stick Pins (Long Needle)
Before the modern clutch was invented, there was the stick pin. This consists of a very long (2 to 3 inches), thin needle. The design sits at the top, and the needle slides vertically through the lapel. A small protective cap slides onto the sharp end at the bottom.
The Look: These offer a vintage, dapper aesthetic. They are popular for weddings, ascots, and scarf pins. Fashion-forward wearers often weave the needle in and out of the fabric so the metal stem is visible on the front of the lapel.
2. Tie Tacks & Tie Bars
If you want to coordinate your accessories, pin designs can be adapted to control your necktie.
- Tie Tack with Chain: This is a sophisticated mechanism. The pin goes through the tie and is secured by a clutch. Attached to that clutch is a small chain with a T-bar at the end. The T-bar slips through a buttonhole on your dress shirt, anchoring the tie to your chest while allowing some natural movement.
- Tie Bar: Alternatively, the design can be soldered onto a horizontal metal clip that slides over both the tie and the shirt placket, holding them together by friction.
User Guide: Troubleshooting and Maintenance
AI Image Prompt: Step-by-step instructional illustration. Panel 1: Finger pushing a locking pin back DOWN towards the pin. Panel 2: Fingers twisting the backing left and right. Panel 3: Fingers pulling the small top disc UP to release. Simple line art with arrows.
How to Remove a Stuck Locking Pin Back
It is a common panic moment: you put on a deluxe locking clutch, and now it won’t come off. You pull and pull, but it is frozen. This usually happens when the internal mechanism jams or the plating thickness makes the fit too tight.
The Fix:
- The Reset: It feels counterintuitive, but first, push the backing down (inward toward the fabric). This helps reset the internal spring mechanism.
- The Twist: While pushing down, gently twist the entire backing left and right. This helps break any friction caused by the plating.
- The Release: While maintaining that downward pressure, pinch the top disc (the head) and pull it up firmly. The clutch should release.
Preventing Spinning Pins
We mentioned the “spur” earlier, but what if your pin doesn’t have one? A spinning pin looks sloppy. To fix this on a single-post pin, you can place a small piece of double-sided tape on the back of the pin before pushing it into the fabric. Alternatively, use a rubber clutch and push it so tight that the friction of the rubber against the fabric holds the pin in place.
Comparative Analysis Table
To help you summarize all this information, here is a quick reference guide comparing the major backing types based on security, comfort, and use case.
| Backing Type | Security | Comfort | Ease of Use | Best Application |
|---|---|---|---|---|
| Butterfly Clutch | Low | Low | High | Display boards, lanyards, giveaways |
| Rubber Clutch | Medium | High | Medium | Hats, t-shirts, skin contact |
| Deluxe Locking | High | High | Medium | Jackets, bags, valuable pins |
| Allen Key Lock | Maximum | Low | Low | Permanent biker vests, industrial use |
| Magnet | Low | High | High | Silk, suits, delicate fabrics |
| Safety Pin | High | Medium | Low | Heavy, oversized, or wide pins |
Frequently Asked Questions (FAQ)
It depends on the use. Rubber backs are superior for comfort (skin contact) and often have a tighter grip than standard metal butterfly clutches. However, metal backs are more durable over long periods as rubber can dry out and crack.
Backpacks experience a lot of friction and movement. Standard butterfly or rubber clutches will likely fall off. The best solution is to upgrade to Deluxe Locking Clutches or Allen Key Pin Locks. These mechanically lock onto the post and cannot be pulled off by accident.
Yes, but it requires force. Leather is thick and tough. You must ensure your pin has a sharp post. Standard posts might be too short for thick leather; you may need pins with extended posts. Once through, use a locking back, as standard clutches may pop off due to the thickness of the leather pushing against them.
“Military clutch” is simply another name for the standard butterfly clutch. It got this name because it was the standard issue backing for military insignia pins and ribbon racks for decades.
Generally, no. Magnetic backs are best suited for thin materials like dress shirts, blouses, or suit lapels. The magnetic field struggles to hold securely through thick wool, denim, or leather, making the pin prone to falling off.
Conclusion
The world of pin backs is surprisingly vast, but finding the right one doesn’t have to be a guessing game. It is all about matching the hardware to the environment. If you are a creator selling pins to a fashion-forward crowd, offering rubber clutches gives them comfort and style. If you are a collector putting a rare, $50 pin on a bag that gets thrown in overhead bins, investing a few dollars in locking backs is mandatory insurance. And if you are dressing up for a gala, a magnetic back allows you to show your flair without ruining your suit.
Don’t treat the back of your pin as an afterthought. It is the anchor that keeps your memories, your art, and your style exactly where they belong—with you.