Konačan popis za provjeru: 5 puta ispisana igla vaša je najbolja (ili jedina) opcija
Ovo je srž vaše odluke. Tradicionalne emajlirane igle su fantastične, ali imaju fizička ograničenja. Ako vaš dizajn spada u bilo koju od sljedećih pet kategorija, tiskana pribadača nije samo alternativa; to je vrhunsko rješenje.

Scenarij 1: Vaš dizajn je fotografija
Ovo je najčešći razlog za odabir tiskane pribadače. Fotografija se sastoji od milijuna sićušnih piksela, od kojih svaki ima nešto drugačiju boju, stvarajući suptilne promjene u tonu i svjetlu. Proces emajliranja, koji zahtijeva čvrste blokove boje odvojene metalnim linijama, to jednostavno ne može ponoviti.
Rješenje s ispisanom iglom koristi digitalne pisače visoke razlučivosti koji mogu savršeno reproducirati te milijune piksela na metalnu površinu, stvarajući jasnu, jasnu i vjernu reprodukciju vaše izvorne fotografije. Za potpuni pregled svih stilova pribadača, posjetite naš Vrhunski vodič za prilagođene igle za revere.
- Uobičajeni slučajevi upotrebe: Memorijalne značke s portretom osobe, značke političke kampanje, značke za isticanje voljenog kućnog ljubimca, značke za nekretnine sa slikom kuće ili promotivne značke s novim proizvodom.
Scenarij 2: Vaš dizajn sadrži prijelaze boja i sjenčanje
U tradicionalnoj emajliranoj igli, metalne "matrične linije" djeluju kao fizički zidovi. To onemogućuje glatko stapanje jedne boje u drugu. Ako vaš logotip ili umjetničko djelo sadrži gradijente - poput zalaska sunca koji blijedi iz narančaste u ljubičastu ili realističnog 3D sjenčanja na objektu - emajl nije opcija.
Proces ispisa CMYK je, međutim, posebno dizajniran za stvaranje tih efekata. Baš poput visokokvalitetnog ispisa iz časopisa, koristi sitne točkice boje za stvaranje iluzije glatkog, besprijekornog prijelaza iz jedne nijanse u drugu. Ovo je nešto što čak i najviše premium igla od tvrdog emajla ne može učiniti.
Scenarij 3: Vaš dizajn ima izuzetno fine detalje koji nisu zatvoreni
Ovo je više tehnička točka na stručnoj razini. Kao što smo utvrdili, emajl boje moraju biti u "bazenu" potpuno okruženom metalnim zidom. Ali što ako imate sićušni detalj, poput mrlje na krafni, za koji želite da bude druge boje, ali ne želite metalnu crtu oko njega? Ili što ako imate vrlo mali, delikatni tekst koji bi bio ispunjen metalnim obrisom?
Budući da se dizajn na tiskanoj pribadači ispisuje izravno na površinu, nisu potrebni metalni zidovi između boja. To omogućuje savršen prikaz sićušnih, slobodno lebdećih detalja i teksta, bez potrebe za metalnom linijom. Ovo je kritična točka koju pokrivamo u našem 10 kritičnih savjeta za dizajn pribadača.
Scenarij 4: Vaš dizajn ima ogroman broj boja (20+)
Dok se emajlirane igle mogu izraditi u mnogo boja, svaka se boja obično puni ručno i često zahtijeva poseban ciklus pečenja. Dizajn s 20, 30 ili 50+ različitih boja postaje nevjerojatno radno intenzivan i skup za proizvodnju kao emajlirana igla. Cijena bi bila previsoka.
CMYK pisač, s druge strane, može proizvesti milijun boja jednako lako kao što može proizvesti četiri. S tiskanim pribadačama, broj boja u vašem dizajnu praktički nema utjecaja na cijenu. To ga čini najekonomičnijim izborom za reprodukciju zamršenih ilustracija, dizajna prozora od obojenog stakla ili složenih zastava i pečata.
Scenarij 5: Trebate savršenu replikaciju digitalne umjetnosti piksel za piksel
Proces pretvaranja digitalne umjetnosti u metalni kalup i čvrste boje emajla uvijek uključuje određeni stupanj pojednostavljenja i interpretacije. Konačna emajlirana igla je prekrasna reprezentacija umjetnosti, ali to nije 1:1, piksel savršena kopija.
Ako je vaš cilj točna, vjerna reprodukcija vašeg izvornog digitalnog umjetničkog djela—uključujući svaku suptilnu teksturu, digitalni potez kistom i varijacije boja—offsetni tisak je jedini način da to postignete. Poštuje integritet izvorne umjetnosti bez kompromisa.
Unutar tvornice: Tehnologija iza tiskanih pribadača
Razumijevanje procesa proizvodnje pomaže vam da cijenite mogućnosti ovog svestranog stila pribadače. Postoje dvije glavne metode za ispis pribadača, svaka sa svojim prednostima.
Offset tisak u odnosu na UV tisak: u čemu je razlika?
- Offset tisak (tradicionalna metoda): To je ista tehnologija koja se koristi za ispis visokokvalitetnih časopisa i brošura. Koristi sitne točkice cijan, magenta, žute i crne (CMYK) tinte prenesene s ploča na metalnu površinu za stvaranje slike u punoj boji. To je najbolja metoda za postizanje fotografskog realizma i glatkih gradijenata.
- UV ispis (moderna metoda): Ovaj proces koristi sofisticiranu inkjet metodu za nanošenje tinte izravno na metalnu površinu. Odmah nakon nanošenja tinte, ultraljubičasto (UV) svjetlo visokog intenziteta prolazi preko nje, trenutno stvrdnjavajući i stvrdnjavajući tintu. To rezultira nevjerojatno jasnim, oštrim i živopisnim dizajnom.
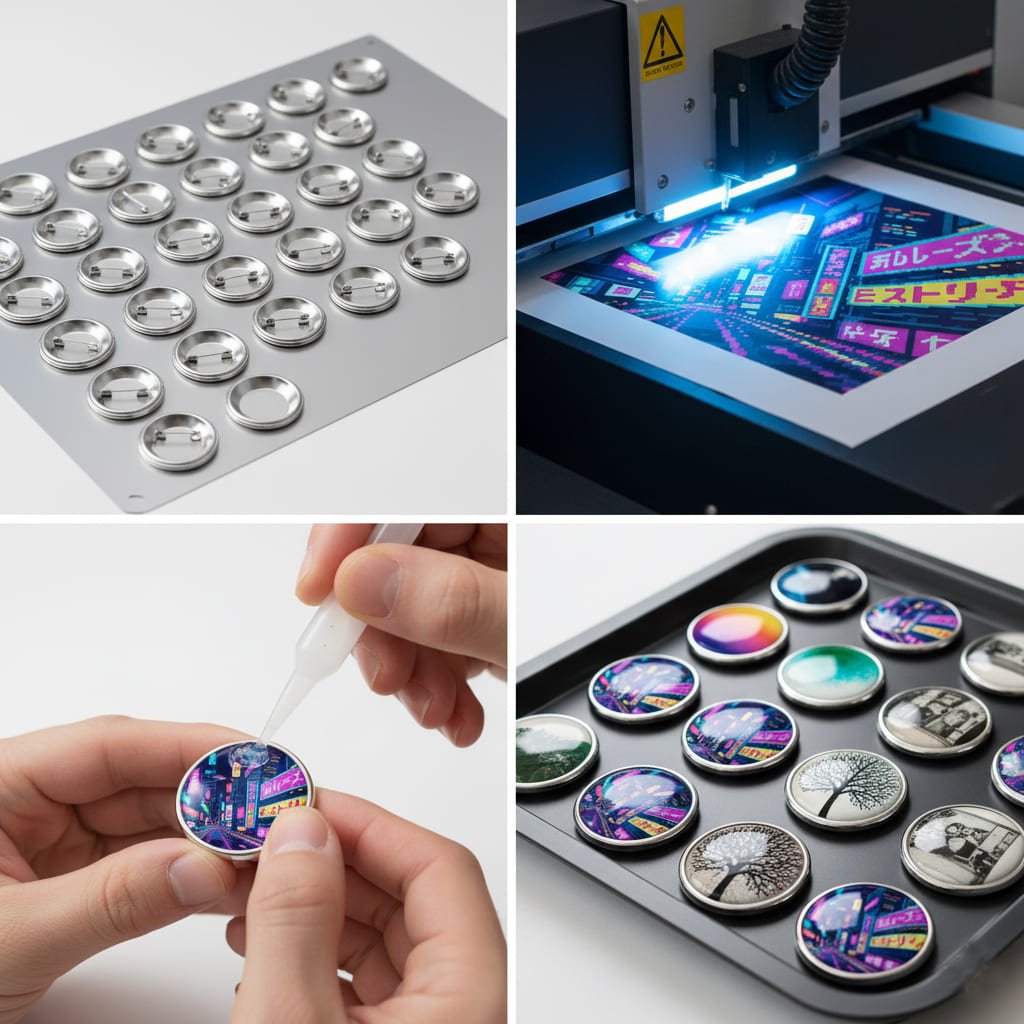
Proces UV ispisa korak po korak
- Stvaranje praznine: Prvo se metalni list (nehrđajući čelik ili mesing) utisne i izreže u prilagođeni oblik vaše pribadače.
- Temeljni premaz (izborno): Kako bi boje bile još živopisnije, na metalnu površinu se prvo može raspršiti bijeli temeljni premaz.
- Ispis: Vaša digitalna datoteka visoke razlučivosti šalje se UV pisaču, koji nevjerojatnom preciznošću nanosi tintu izravno na metalnu ploču.
- UV stvrdnjavanje: UV svjetlo trenutno stvrdnjava tintu, čineći je tvrdom i izdržljivom.
- Epoksidna kupola: Ovo je ključni korak. Kristalno proziran, zaštitni sloj epoksidne smole nanosi se preko cijele tiskane površine.
- Završno stvrdnjavanje & Skupština: Epoksid je otvrdnuo, pin backing je pričvršćen, a igla prolazi završnu kontrolu kvalitete.