You have the perfect design for a custom lapel pin. It’s creative, it’s meaningful, and it’s ready to be brought to life. But as you start the ordering process, you hit the first major crossroad: “Hard Enamel” or “Soft Enamel”? These terms are everywhere, but the real differences are crucial to your project’s success. It’s a choice that impacts everything from the feel in your hand to the longevity of the pin itself.
This guide will be the only resource you need to make that choice with confidence. We’ll go beyond the surface to explore every angle—the texture, the microscopic details of the manufacturing process, the color possibilities, and the cost implications. This information, drawn from our experience producing millions of custom pins, will empower you to select the perfect style for your vision. The decision is essentially a choice between a textured, dimensional piece of art (Soft Enamel) and a smooth, jewelry-quality emblem (Hard Enamel). To understand where this decision fits into the larger picture, you can always refer to our Ghid definitiv pentru ace personalizate.
Cuprins
What Is the Quickest Way to Tell the Difference? (The 10-Second Answer)
Before we dive deep, let’s give you the simple, immediate answer. If you have two pins in your hand and want to know which is which, you can tell in seconds.
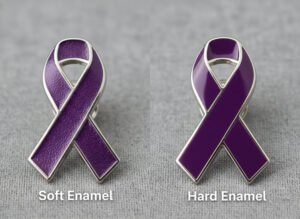
The “Finger Test”: This is the easiest method. Gently run your fingertip across the face of the pin. If you can feel the raised metal lines and the slightly recessed areas of color, you are holding a ac de email moale. The surface has a distinct, dimensional texture. If the surface is perfectly smooth, flat, and glossy, like running your finger over glass, it’s a hard enamel pin.
The “Light Test”: Hold the pin up to a light source and tilt it. A soft enamel pin will create tiny shadows along the inside edges of the metal lines, which enhances its textured appearance. A hard enamel pin will have a uniform, polished reflection across its entire surface, with no shadows to break the smooth sheen.
The Core Concept Table
For a quick, at-a-glance comparison that summarizes the most important distinctions, this table covers the essentials.
High-Level Comparison: Soft Enamel vs. Hard Enamel
| Caracteristică | Soft Enamel Pin | Hard Enamel Pin (Cloisonné) |
|---|---|---|
| Texture | Textured & Dimensional: Raised metal lines, recessed enamel. | Smooth & Flat: Metal and enamel are on the same level. |
| Appearance | 3D, tactile, traditional “pin” look. | Jewelry-quality, glossy, modern, premium finish. |
| Durability | Good, but more susceptible to scratches on the enamel. | Extremely durable, scratch-resistant, and UV-stable. |
| Cost | More affordable, less labor-intensive. | More expensive (typically 20-40% more). |
| Best For | Artists, detailed designs, trading pins, budget-conscious projects. | Corporate logos, awards, luxury branding, high-use items. |
How Are Custom Enamel Pins Made, and Why Are the Processes Different?
To truly understand why these two pin types are so different, you need to look inside the factory. The final product’s characteristics—its texture, durability, and even color options—are a direct result of two distinct manufacturing paths. While they start from the same place, their journeys diverge in a way that fundamentally changes the outcome.
The Shared Origin: The Die-Struck Mold
Both hard and soft enamel pins begin their life in the exact same way. First, your digital design is converted into a production-ready file. Then, a CNC machine engraves this design into a block of hardened steel, creating a die, or mold. This mold is then used in a massive hydraulic press to stamp your design’s impression onto a sheet of base metal, typically iron or brass. At this point, you have a raw metal “blank” of your pin, and this is where their paths split.
The Soft Enamel Process: A Path of Plating First
Think of the soft enamel process as efficient and direct. The order of operations is key to understanding its unique properties.
- Stamping & Trimming: The design is stamped into the metal sheet, and the individual pins are cut to their final shape.
- Electroplating (The Key Step): This is the most important differentiator. The raw, stamped metal pin is plated with its final metal finish before any color is added. It’s dipped in a bath to receive its coating of gold, silver, copper, or black nickel. This early plating step is precisely why soft enamel has a wider range of available metal finishes, which we’ll cover later.
- Enamel Filling: Using small, needle-like dispensers, skilled artisans carefully fill the recessed areas of the pin with liquid enamel paint. Crucially, they only partially fill these areas, so the enamel settles below the top of the raised metal die lines.
- Baking (Curing): The pin is passed through an oven at a relatively low temperature. This single baking cycle hardens, or “cures,” the enamel, making it solid and durable.
- (Optional) Epoxy Coating: After baking, a clear, protective epoxy resin can be poured over the top. This dome fills in the recessed areas, creating a smooth surface and adding a layer of protection.
The Hard Enamel Process: A Path of Polishing and Precision
The hard enamel process is a more labor-intensive craft, often referred to as “Imitation Hard Enamel” or by its traditional name, “Cloisonné.” It is a testament to precision and patience, resulting in a product of exceptional quality.
- Stamping & Trimming: This step is identical to the soft enamel process.
- Enamel Filling (The Key Step): Here, the enamel is overfilled into the recessed areas. The liquid color rises above the metal die lines, completely covering the face of the pin.
- Baking (Multiple Times): This is where the labor and cost increase. The pin is baked in an oven at a very high temperature to fuse the enamel to the metal. This isn’t done just once; it’s baked after each individual color is applied. A pin with five colors will be sent to the kiln five separate times.
- Grinding & Polishing: After the final baking, the pin’s surface is rough and uneven. It then goes through a mechanical grinding and polishing process. A stone wheel grinds the surface down until the excess enamel is gone, leaving the enamel perfectly level and flush with the metal die lines. This creates the signature smooth, glassy surface.
- Electroplating: The pin is plated last. After the surface is perfectly smooth, it’s dipped in the electroplating bath to add the gold, silver, or nickel finish to the exposed metal lines. The harsh polishing process is why hard enamel is incompatible with more delicate finishes like dyed metal.
Process Comparison Table
This table clearly illustrates the critical differences in the manufacturing sequence.
Manufacturing Sequence: Soft Enamel vs. Hard Enamel
| Manufacturing Stage | Soft Enamel | Hard Enamel |
|---|---|---|
| 1. Stamping | ✓ | ✓ |
| 2. Plating | ✓ (Done Early) | ✗ |
| 3. Enamel Filling | ✓ (Partially filled) | ✓ (Overfilled) |
| 4. Baking | ✓ (Once, lower temp) | ✓ (Multiple times, high temp) |
| 5. Polishing | ✗ (Minor polish only) | ✓ (Intensive grinding/polishing) |
| 6. Plating | ✗ | ✓ (Done Last) |
From a production standpoint, the difference is labor. A soft enamel pin is an efficient, assembly-line product. A hard enamel pin is a handcrafted piece that requires multiple stages of baking and hand-polishing. That’s the craftsmanship you’re paying for.
Ready to Turn Your Vision into a Reality?
Now that you’re an expert on enamel types, the next step is to see your design come to life. Our team can provide advice on which style would best suit your artwork and budget, and prepare a no-obligation digital proof so you can see exactly how your pin will look.