Kapitel 1: D'Fondatioun: Versteesdemech Pin Typen
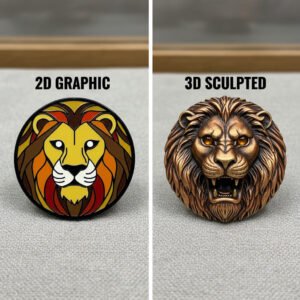
Ier Dir iwwerhaapt iwwer Design denkt, musst Dir de Stil vun Ärem Pin wielen. Dëse Choix beaflosst alles: d'Textur, d'Haltbarkeet, de Präis an d'Gesamtvibe. Loosst eis d'Haaptspiller opbriechen.Hard Email vs Soft Email: Déi grouss Debatt
Dëst ass déi allgemeng Entscheedung déi Dir maacht. Och wann hir Nimm ähnlech kléngen, sinn d'Endprodukter bemierkenswäert anescht. Denkt drun wéi Dir tëscht enger glänzender Foto an enger texturéierter Molerei wielt."Déi éischt Fro, déi mir ëmmer e Client stellen, ass iwwer déi virgesinn Notzung vum Pin. Ass et e Firmegeschenk fir Joeren ze daueren, oder e lëschtegen, trendy Artikel fir e Museksfestival? D'Äntwert weist bal ëmmer direkt op entweder haart oder mëll Email."
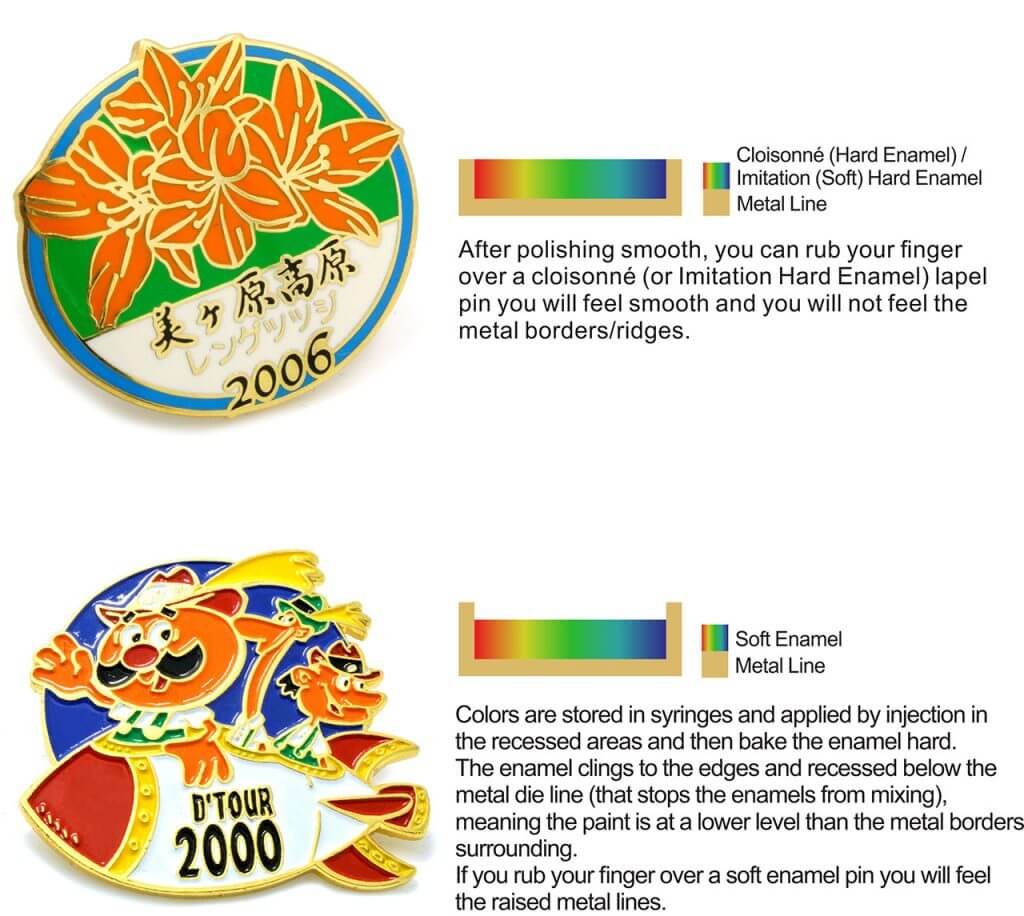
Hard Email vs Soft Email: Quick Verglach
| Fonktioun | Hard Emaille (Cloisonné) | Soft Email |
|---|---|---|
| Uewerfläch Gefill | Perfekt glat a flaach | Texturéiert, mat opgehuewe Metalllinnen |
| Haltbarkeet | Extrem héich, kraazbeständeg | Gutt, kann mat Epoxy verbessert ginn |
| Erkannt Wäert | Héich, Bijou-ähnlech | Exzellent, populär fir Retail / Konscht |
| Beschte Fir | Corporate Branding, Auszeechnunge a Luxusgidder | Promotiounen, Kënschtler Merch, Trading Pins |
| Käschten | Méi héich | Méi rentabel |
Aner Schlëssel Pin Stiler & Uwendungen
Nieft Email, e puer aner Stiler déngen spezifesch Besoinen:- Die Struck Pins: Denkt reng, klassesch Metal. Dës Pins hu keng Faarffill. Den Design gëtt mat opgehuewe an ageschniddene Metallberäicher erstallt. Si si perfekt fir en zäitlosen, elegante Look. Léiert méi an eisem Guide fir Classic, No-Color Metal Pins ze kreéieren.
- Gedréckte Pins (Offset): Wat wann Ären Design Gradienten, Schatten oder souguer eng Foto huet? Dat ass wou gedréckte Pins erakommen, wat fir onlimitéiert Faarf a fotorealistesch Detailer erlaabt. Entdeckt wéini gedréckte Pins fir komplex Designs ze wielen.
Kapitel 2: Design fir Fabrikatioun (DFM): De Blueprint fir Erfolleg
Dëst ass wou sou vill Projete falsch goen. En Design deen erstaunlech op Ärem Computerbildschierm ausgesäit kann onméiglech sinn als 1,25 Zoll Pin ze produzéieren. Fir Problemer ze vermeiden, ass et essentiell fir bescht Praktiken ze verfollegen. Eise Guide op der 10 Critical Design Tipps fir eng onvergiesslech Lapel Pin ze kreéieren ass e Must-Lies fir all Creator.
Regel #1: All Faarf brauch en Heem (getrennt vum Metal)
An engem Emaille Pin ass all Faarfberäich wéi eng kleng Schwämm. Déi opgehuewe Metalllinnen sinn d'Maueren vum Pool, déi de flëssege Email op der Plaz halen. Dofir muss all eenzel Faarf an Ärem Design komplett vun enger Metalllinn zougemaach ginn. Faarwe kënnen sech net direkt beréieren. Dëst ass déi wichtegst Regel am Pin Design.

Regel #2: Respektéiert d'Minimums
Eis Maschinnen an Handwierker sinn onheemlech präzis, awer si schaffen nach ëmmer an der kierperlecher Welt. Ze dënn Linnen oder Faarfberäicher déi ze kleng sinn, kënnen einfach net zouverlässeg produzéiert ginn.
Schlëssel Design Constraints fir Fabrikatioun
| Design Element | Minimum Gréisst / Dicke | Firwat Et Matters |
|---|---|---|
| Metal Linn Dicke | 0.2mm | Assuréiert datt d'Linn staark genuch ass fir Email ze halen an net beim Stamping ze briechen. |
| Faarf Beräich (Emaill Fëllung) | 0.3 mm | Garantéiert datt d'Email an d'Géigend fléien an se komplett ausfëllen. |
| Ausschnëtter (Bannen Lächer) | 1,5 mm - 2,5 mm | Verhënnert datt de Pin ënner dem Drock vun der Stampingpress kräizt oder briechen. |
| Textgréisst (Sans-Serif) | 6 pkt | Assuréiert datt d'Bréiwer liesbar sinn an d'Plazen an hinnen richteg ausgefëllt kënne ginn. |
Regel #3: D'Kraaft vu Pantone (PMS)
Fir Är Mark spezifesch Schatt vu blo ze garantéieren ass genee richteg, der Fabrikatioun Welt hänkt op der Pantone Matching System (PMS). Et ass wéi en universellt Rezeptbuch fir Faarf. Fir ze verstoen firwat dëst sou kritesch ass, kuckt eis Erklärer: Firwat Pantone ass net Verhandlunge fir Är Mark.
Regel # 4: Vecteure Fichieren sinn Kinnek
Gitt w.e.g. Är Konschtwierker als vektor Datei (.AI, .EPS, oder .SVG). Eng Pixel-baséiert Datei wéi e .JPG oder .PNG ass net ideal a muss nei gezeechent ginn. Fir eng kloer Erklärung, kuckt eis Einfach Guide fir Vector Artwork fir Net-Designer. Fir e méi techneschen Iwwerbléck, dëst Raster vs Vector Erklärer vun Adobe ass eng exzellent Ressource.
Kapitel 4: Plating: D'Finishing Touch
Plating ass déi dënn Schicht vu metallesche Finish, déi op Äre Pin applizéiert gëtt. Et ass wat d'Metalllinnen hir lescht Faarf a Glanz gëtt. Dëse Choix beaflosst dramatesch d'Stëmmung vun Ärem Pin.
"Eng einfach Ännerung am Plating kann en Design vu spilleresch bis prestigiéist huelen. Glänzend Gold fir en antike Sëlwerfinish austauschen kann e Pin fillen wéi en historeschen Artefakt. Et ass e mächtegt Tool."
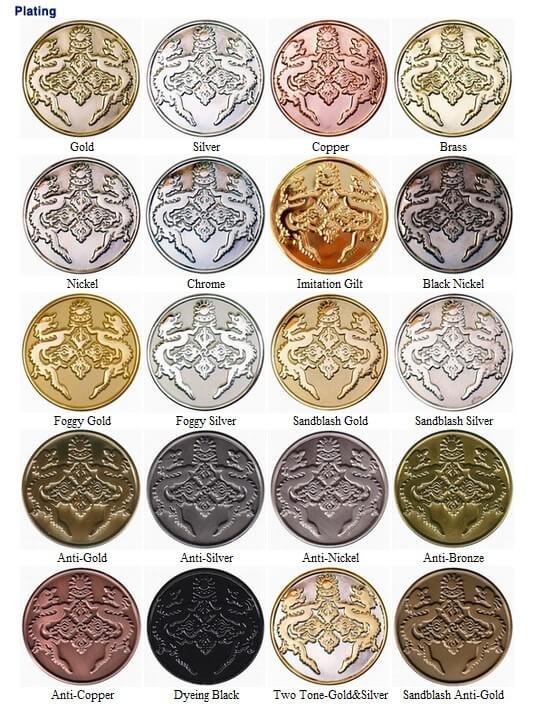
Populär Metal Plating Optiounen
| Plating Typ | Beschreiwung | Beschte Fir |
|---|---|---|
| Glänzend Gold / Sëlwer | Héich poléiert, spigelähnlech Finish. Klassesch an hell. | Firmenlogoen, Auszeechnunge, Designen déi musse Pop. |
| Antik Gold / Sëlwer / Bronze | Chemesch al fir däischter ageschniddene Beräicher ze kreéieren, Detailer ënnersträichen. | Designs mat vill Textur, Vintage Looks, Militär oder Gedenkpins. |
| Black Nickel | Eng glat, donkel, bal gunmetal Finish. Modern a stilvoll. | Kontrastéiert mat helle Faarwen, schaaft en edgy oder zäitgenëssesch Gefill. |
| Rainbow / Anodiséiert | Eng iriséierend, multi-faarweg Finish wou d'Faarwen mam Liicht verschwannen. | Opfälleg an eenzegaarteg artistesch Pins. (Notiz: Nëmme verfügbar fir mëll Email). |
| Schwaarz gefierft | E matte, net reflektéierende schwaarze Finish. | E staarke Kontrast erstellen, dacks a Kënschtlerpins benotzt fir e fett Kontur. |
Déi richteg Plating ze wielen ass eng Konscht. Gesinn se all an eisem Visuell Guide fir Metal Plating Optiounen.
Kapitel 5: Backings & Uschlëss: The Unsung Hero
Wéi wäert Äre Pin un eng Jackett, Täsch oder Board befestigen? De Backing kann wéi e klengen Detail schéngen, awer et ass entscheedend fir Funktioun a Sécherheet. Fir e kompletten Iwwerbléck iwwer all verfügbare Optiounen, konsultéiert Den Ultimate Guide fir Pin Backings & Uschlëss.
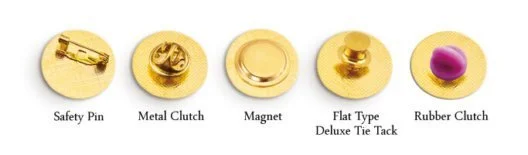
Gemeinsam Pin Backing Optiounen
| Backing Typ | Beschreiwung | Benotzt Case |
|---|---|---|
| Päiperlek Kupplung | D'Industrie Norm. Eng Metallkupplung déi Dir dréckt fir ze befreien. | Standard fir déi meescht Pins. Gutt fir allgemeng Benotzung. |
| Gummi Kupplung | Eng mëll PVC Kupplung. Méi bequem géint Haut a ganz sécher. | Wearable Artikelen, Kënschtler Pins, e populäre a bezuelbare Upgrade. |
| Deluxe / Sperrkupplung | E Fréijoersbelaaschte Mechanismus deen op d'Poste gespaart ass. Ganz sécher. | Verhënnert Verloscht vu wäertvollen oder sentimentale Pins. Great fir Händler. |
| Sécherheet Pin | Eng traditionell Brosche-Stil Pin zréck. | Méi grouss Pins oder fir Stoffer ze befestigen wou e Post net funktionnéiert. |
| Magnete | Zwee mächteg Magnete (een op der Pin, een fir bannen an der Kleeder). | Delikat Stoffer wéi Seid oder fir jiddereen deen net e Pinhole wëll. |
Pro Tipp: Fir Pins méi grouss wéi 1,25 Zoll, benotzt ëmmer zwee Posts op der Réck. Dëst verhënnert datt de Pin dréint an hält se sécher op der Plaz.