中心的な概念: 2D ピンと 3D ピンの違いは何ですか?
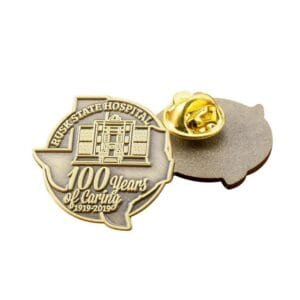
技術的な詳細に入る前に、シンプルで直接的な答えから始めましょう。あ 2Dピン は平坦で明確なレベルを備えたデザインで、通常、一方が盛り上がっていてもう一方が凹んでいて、古典的な漫画のようなすっきりとしたグラフィックな外観を作り出しています。あ 3Dピン一方、 は滑らかに湾曲し、丸く、輪郭のある表面を備えたデザインで、コインの表面のようなリアルで彫刻的な複数レベルの効果を生み出します。

コアコンセプト比較表
主な違いの概要: 2D ピンと 3D ピン
| 特徴 | 2Dモールドピン | 3Dモールドピン |
|---|---|---|
| 表面 | 平坦なレベル、鋭角、はっきりとした凹凸のある領域。 | 滑らかに湾曲し、丸みを帯びた、輪郭のある表面。 |
| 外観 | グラフィック、クリーン、大胆、クラシックな「エナメルピン」の外観。 | 彫刻的、現実的、本物そっくり、次元的。 |
| 最適な用途 | ロゴ、テキスト、シンプルなイラスト、最も標準的なデザイン。 | 顔、キャラクター、建物、乗り物、複雑なテクスチャ。 |
| 製造業 | 型打ち工程を簡素化。 | 複雑なダイカスト工程。 |
| 料金 | 標準料金(より手頃な価格)。 | プレミアムコスト (大幅に高価)。 |
工場の現場: 各金型がどのように作られ、使用されるのかを詳しく知る
最終製品を真に評価するには、2D ピンと 3D ピンの背後にある異なる製造工程を理解することが役立ちます。このプロセス自体が、ピンの最終的な外観、感触、さらには使用される素材を決定します。
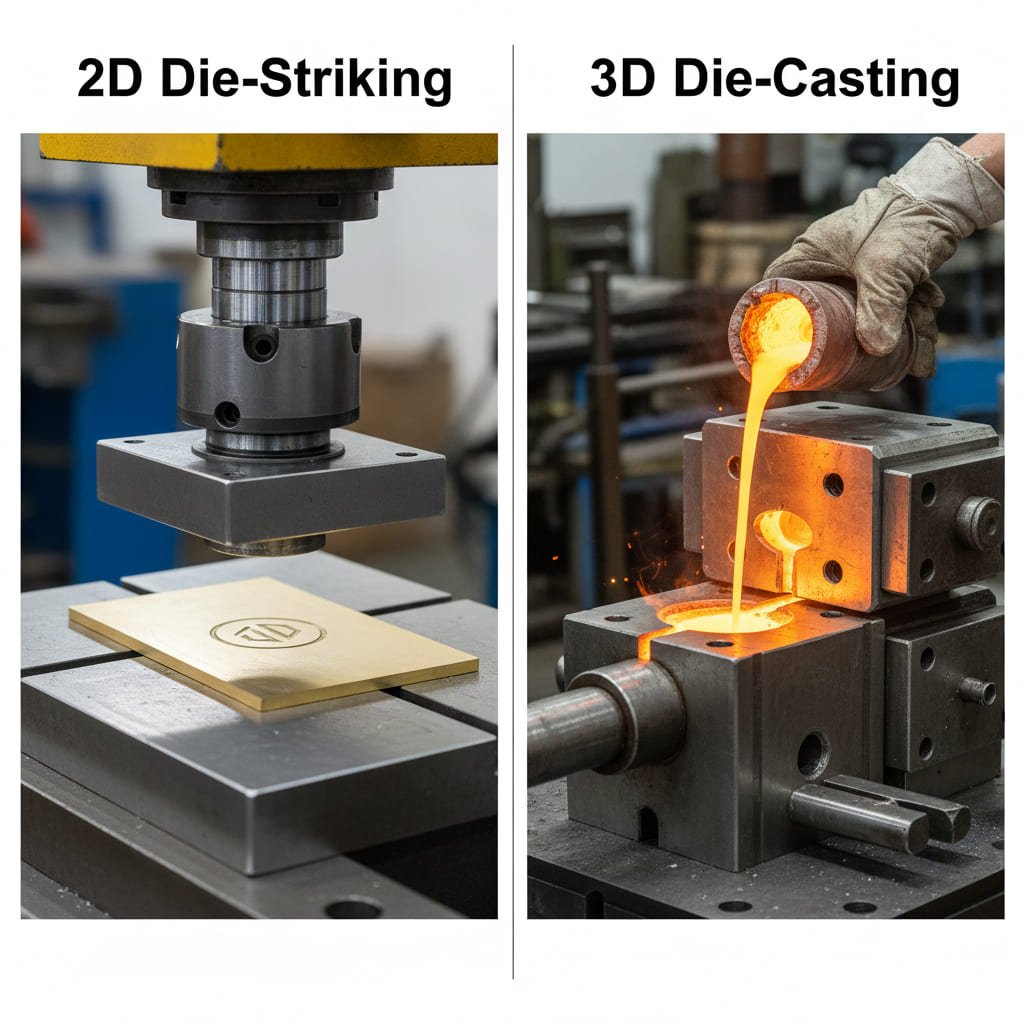
2D モールド プロセス: ストライクの芸術
2D プロセスは、ほとんどのカスタム ピンの基礎です。これは、きれいなグラフィック デザインを作成するための効率的かつ正確な方法です。
- 型の作成: CNC (コンピューター数値制御) マシンが 2D を彫刻するところから始まります。 ベクターファイル 硬化鋼のブロックにします。機械はアートワークのきれいなラインに従って、明確で平らなレベルの金型を作成します。
- 製造プロセス: 型打ち。 次に、強力な油圧プレスがこの金型を取り出し、強大な力で固体金属 (通常は真鍮、鉄、または銅) のシートに打ち付けます。この打撃により金属にデザインが刻印され、明確な凹凸が形成されます。このプロセスは、クラシック、ノーカラーの両方の基礎となります。 ダイス打ちピン そして伝統的な エナメルピン。
3D モールドプロセス: キャストの科学
3D ピンの作成はより複雑で彫刻的な芸術形式であり、さまざまなテクニックと材料が必要です。
- 型の作成: このプロセスはフラット ファイルではなく、3D デジタル モデルから始まります。次に、専用の多軸 CNC マシンが何時間もかけて、このモデルの流れるような輪郭のある表面をスチール製の型に注意深く彫り込みます。
- 製造プロセス: ダイカスト。 このプロセスでは、固体の金属シートをスタンピングする代わりに、溶融金属を射出することが含まれます。 亜鉛合金—高圧下で複雑な 3D 金型に押し込みます。
- なぜ亜鉛合金なのか? 亜鉛合金は、融点が低く、流動性に優れているため、3D ピンに最適な金属です。これにより、複雑な 3D モールドのあらゆる小さな隙間、曲線、微妙な輪郭を埋めることができ、彫刻の細部を完璧に捉えることができます。
製造工程比較表
技術的な違い: 2D 製造と 3D 製造
| 特徴 | 2Dモールドプロセス | 3Dモールドプロセス |
|---|---|---|
| アートワークの開始 | 2D ベクター ファイル (.AI、.EPS) | 3D デジタル モデル (.STL、.OBJ) |
| 金型の作成 | 平らなレベルの CNC 彫刻がより簡単かつ高速になりました。 | 複雑で多軸の、時間のかかる彫刻彫刻。 |
| 製造方法 | ダイストライキング (無垢金属のプレス加工) | ダイカスト (溶融金属の注入) |
| 一次ベースメタル | 真鍮、鉄、銅 | 亜鉛合金 |
デザイナーズ ガイド: 2D デザインと 3D デザインのアプローチ方法
選択した製造プロセスを最大限に活用するには、そのプロセス特有の強みを念頭に置いて設計することが役立ちます。平面的なグラフィックレイヤーで考えているのか、それとも彫刻的で流れるような深さで考えているのか?
2D デザインをマスターする: 奥行きの錯覚を作成する
2D の「平面」の世界であっても、強力な立体感を生み出すことができます。これは「2.5D」効果と呼ばれることもあります。複数の異なるレベル (凹んだ背景、中間レベルの要素、最上位の要素など) を使用することで、標準 2D ピンに奥行きと視覚的な面白さを加えることができます。これを別のものと組み合わせると、 金属メッキオプション この効果をさらに高めることができます。
3D デザインをマスターする: 彫刻家のように考える
真の 3D ピンを設計するには、光、影、形状について考える必要があります。ここでのキーコンセプトは、彫刻の古典的な用語である「レリーフ」です。
- ローリリーフ: これには、コインの顔の横顔のような、微妙で浅い彫刻が含まれます。細部は存在しますが、劇的に向上するわけではありません。
- ハイレリーフ: これには、大幅な深さと陰影を備えた深くてドラマチックな彫刻が含まれ、より際立った本物のような効果が作成されます。
3D デザインを作成するには、専門の 3D デジタル アーティストがモデルを構築する必要があります。これは 2D ロゴから簡単に変換できるものではありません。当社の社内設計チームには 3D モデリングの専門家がおり、お客様と協力してコンセプトを完全に彫刻されたデジタル モデルに変換し、金型作成の準備が整います。